Basic Concepts
What is Scriptr.io?
Scriptr.io is a very powerful cloud service to run your server-side code. With scriptr.io, you use scripts to create the custom back-end APIs needed to power your Internet of Things (IoT) and other projects. Scriptr.io allows you to get productive quickly by providing an integrated web-based environment for developing, running and debugging your code.
What are Scripts?
Scripts are units of execution, after you create a script, it immediately becomes a web service with a unique secure HTTP end-point and ready to run as soon as it is invoked. Scripts can be created to be used as web services or as modules for other scripts. You can invoke directly your new scriptr.io APIs from an IoT, mobile or web project or from other web services.
What is the Difference between Using scriptr.io and Running Your Own Servers?
With scriptr.io, you don't need to handle hosting, deployment, management and upgrade of servers such as application containers, database servers or libraries to integrate with social networks and other web services. When your product goes to production and you need quick reliable scaling, you don't have to figure-out server architecture, scalability strategies, fault-tolerance, etc... You only concentrate on improving the business logic needed to power your project while we make sure that everything else is running smoothly for you.
Supported Languages
For now our script containers support JavaScript. We will be adding other languages in the future.
What about Authentication and Security?
Invoking scriptr.io URLs
Scriptr.io scripts are invokable based on the following patterns for the POST and GET methods respectively:
curl -X POST -F <requestParameter> -d <postBody> -H "Authorization: bearer <authorizationToken>" "https://api.scriptrapps.io/<scriptName>"
curl -X GET -H "Authorization: bearer <authorizationToken>" "https://api.scriptrapps.io/<scriptName>?<requestParameter>"
| Parameter | Description |
|---|---|
| httpMethod | HTTP Verb: POST, GET. |
| timestamp | A UNIX timestamp denoting the current time when the request is issued. |
| requestParameter | Request parameter specific to what your script is expecting. |
| postBody | "value1":"some value", "value2":"some value", "value3":"some value". |
| authorizationToken | Unique token provided for each account. |
| scriptName | The unique name per account that you have given to the script you want to invoke. |
What are Experimental Features? 
At scriptr.io, we keep improving our product to bring you the best. You might encounter several features that our team is still developing - they are labelled with the Experimental tag. You may tinker with them as much as you want, but beware that these experimental features might change, break, or disappear at any time.
Getting Started
Open an Account
You can create a new scriptr.io account from this page by providing your email and a password, or signing in with your GitHub, Twitter or Facebook account.
Write Your First Script and Run It
Once you log in to scriptr.io, you land on your workspace. There are plenty of very useful features in it. For now, we will just go ahead and create our first script by clicking New Script at the lower left corner of the screen.
In the scriptr.io editor, simply add a line to return the traditional "Hello world":
return "Hello world";
- Must be minimum 2 characters and maximum 1,000 characters long, including any folders.
- Each folder name must be maximum 255 bytes long.
- Can contain alphanumeric characters, underscores (_), hyphens (-) and periods (.).
- Cannot have two consecutive periods.
Now run your script by clicking Run on the top-right part of the editor. Notice the console in the lower half of the screen where you can see the result of the execution. The first line of the console is the curl instruction to issue from an HTTP client to trigger the execution of your script.
What Can a Script Do?
Well, actually, a lot. When using scripts, you have access to a very rich set of features and modules that are provided to you by scriptr.io, such as storage, gateways to IoT platforms, gateways to external web services, social networks, etc... Scripts allow you to implement all the business logic for your IoT solution.
Check the example below where we create a back-end API for a smart home ambiance regulator. Our script does the following:
- Requires (imports) the scriptr.io http module.
- Retrieves a location from the request it receives (sent by the regulator).
- Invokes a remote weather REST API to obtain the weather forecast for the day.
- Executes a function defined in the script to determine the ambiance according to the obtained temperature and humidity forecast.
- Returns the resulting ambiance to the calling device.
// import the scriptr.io http module to issue calls to remote APIs
var http = require("http");

// retrieve the station parameter from the request
var station = request.parameters.station; // use location = 260

var weatherStationAPI = "http://fawn.ifas.ufl.edu/controller.php/today/obs/" + station + ";json";
// invoke the weatherStationAPI third party API
var callResult = http.request({
		"url" : weatherStationAPI
	});
// parse the result of the call using regular JSON object
var weatherInfo = JSON.parse(callResult.body); // returns an array of today's observations
var latestInfo = weatherInfo[0]; // get latest observation, first one on the list
var temperature2m = latestInfo.t2m;
var windSpeed = latestInfo.ws;
// return the result of the function call
return getAmbianceConfiguration(temperature2m, windSpeed);

// define a bespoke function
function getAmbianceConfiguration(temp, wind) {
	var tempCategory = (temp < 18) ? "Cold" : (temp >= 18 && temp <= 25) ? "Cool" : "Hot";
	var windCategory = wind < 20 ? "No Wind" : (wind > 20 && wind < 50) ? "Windy" : "Strong Wind";
	return {
		"temp" : tempCategory,
		"wind" : windCategory
	};
}
Authentication and Security
What are Tokens?
Tokens are credentials that you send with your requests to authenticate yourself and gain access to your protected resources in your scriptr.io account.
Upon registration, scriptr.io provides you with the "scriptr" device and its token which are used within the IDE to execute your scripts. You can also send this token along with your requests in order to authenticate yourself as the owner of the application. Note that you should keep this token secret and not distribute it.
However, you can always create more devices and tokens to control who has access to your application. Managing your devices and tokens can be achieved using the Device Directory in your scriptr.io account or programmatically by calling the APIs of the device module.
What is an Anonymous Token?
Sometimes you will want to allow end users / devices to invoke your scripts without any authentication. Yet you still want to control who / what is able to do so. For that purpose, scriptr.io provides you with an Anonymous Token (similar to API keys) that you can distribute to those users.
How to Get Your Tokens?
Two tokens have automatically been generated for you when you first registered to scriptr.io. You can find them under the Access tab of the Settings menu at the top-right corner of your workspace. Moreover, you can create more tokens from the Device Directory section.
How to (Re)Generate Your Tokens?
Under the Device Directory, in the Device tab, click the regenerate icon in order to create a new token.
After your generate a new token, all requests using the former version will fail to authenticate.
How to Use Your Tokens?
When invoking scriptr.io, you can pass a token to the request in one of the following ways:
- In the request's Authorization header, such as "Auhtorization: bearer yourToken".
- In the request's auth_token parameter.
Scriptr.io IDE
IDE Overview
Scriptr.io provides an efficient web based IDE that gets you productive as soon as you sign up.
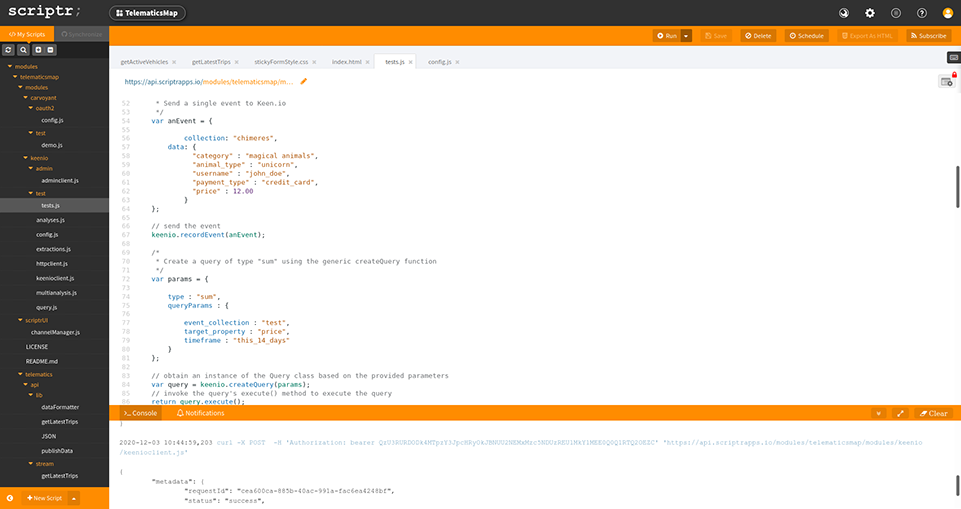

- Create a new script by clicking New Script.
- Create different script or file types by clicking the arrow icon next to the New Script button, then selecting desired type such as Blockly Script, Google Charts or HTML file.
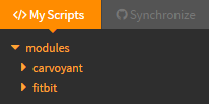
- All the scripts you created are listed under My Scripts. If you grouped your scripts into folders, click the arrow next to the folder name to expand its content.
- A view that allows you to synchronize your scriptr.io resources with a remote GitHub repository. It provides you with the tools to resolve conflicts, update/commit changes from/to the repository.
- When creating a new script, you need to give it a name. You can specify here the path (folders) to your script. For modifying the name of an existing script, click the pencil icon.
- Edit your script code in this section.
- Navigate through the scripts that you already opened in the IDE by clicking their respective tab. Drag and drop the tabs to reorder them.
- You can run a script by clicking Run. If you want to pass request parameters to the script, click the drop-down arrow then click Run....
- Open the Schedule dialog so you can schedule your scripts. You have the option to pick either a one-time schedule or a recurrent schedule.
- Subscribe the active script to a channel so that it can read and execute business logic on all the messages published to that channel.
- This is where you access all the tools and settings you need to manage and configure your application.
- Show the cheat sheet to view the list of the IDE shortcuts.
- The Access Control List button displayed at the top right corner of the editor allows you to specify who can access the resource.
- The Console is where the outcome of your script is displayed. It also contains the curl instruction that was used to invoke your script.
- The Notifications is where the outcome of your GitHub commit or update is displayed.
- Hide/show/minimize/maximize the console.
- Switch between applications, create new ones and manage them by clicking on the name of the active application.
Managing Applications
Upon registration, a default application is created in your account with the name "My Application".
When an application is loaded in your workspace, it is referred to as your active application and its name always appears on the left of the top menu.
Clicking on the name of the active application opens a drop-down listing all the applications of your account.
Rename Application
To rename an application, go to the applications drop-down list, select Manage Applications and click on the pencil icon next to its name.
Delete Application
To delete an application, go to the applications drop-down list, select Manage Applications and click on the delete icon next to its name.
Upon deleting an application, all of its associated resources (scripts, data, devices, etc.) will be permanently deleted. This action cannot be undone.
Create Application
To create an application, go to the applications drop-down list, select Manage Applications and click the Add Application link, fill in the application name and description then save.
Switch Application
To change the active application, you can either select the application that you want to load from the applications drop-down list or select the button displayed next to the application name in the Manage Applications overlay.
Note that this action will reload your workspace and all its tools (API Explorer, ACL Manager, etc.) with the content of the new active application resulting in losing any unsaved changes, so remember to save before doing so!
Generating Code Using Blockly
The scriptr.io Blockly editor is a customized version of the Google Blockly editor offering an easy way to create a script by dragging and dropping graphical blocks.
To create a new script graphically, use the New Script drop-down list and select Blockly Script. The Blockly editor will open and you can start browsing its toolbox to discover the wide range of blocks representing scriptr.io's APIs and connectors.
The below example illustrates the use of the scriptr.io storage block.

To define and install your own blocks, click on the New Script drop-down list. From the File menu item that appears, select Custom Blocks. An editor will open and allow you to write the definition of your own custom block. The name of the custom block definition should always be prepended with "custom_". Upon saving, you will be prompted to install the previously created block under the toolbox of your Blockly editor inside the category of your choice. Note that you can either create a new category or select an existing one.
To uninstall one of your custom blocks from the toolbox of scriptr.io Blockly editor, double click on the name of your block definition from the list of scripts in your workspace and click the uninstall button in the right corner of the editor that opened.
Deleting the block definition will also remove it from the toolbox of the scriptr.io Blockly editor.
Renaming the definition of a custom block that is already installed will uninstall it. To re-install it, double click on the name of your block definition from the list of scripts in your workspace, choose a category, and click the install button in the right corner of the editor that opened.
Note that Blockly is still an experimental feature, and not all its features are supported yet.
Example of a custom block definition:
Blockly.JavaScript['custom_saveTemperature'] = function(block) {
    var fieldname = block.getFieldValue('fieldName');
    var value = Blockly.JavaScript.valueToCode(block, 'value', Blockly.JavaScript.ORDER_ATOMIC);
    var docKey = block.getFieldValue('docKey');

    var code = '( function(){var document = require("document");\n\
        var docToSave = document.save({"key": "' + docKey + '", ' + fieldname + ': ' + value + '});\n\
        return docToSave;})()';
    return [ code, Blockly.JavaScript.ORDER_NONE ];
};

Blockly.Blocks['custom_saveTemperature'] = {
    init: function() {
        this.appendDummyInput()
            .appendField("Set field ")
            .appendField(new Blockly.FieldTextInput("name"), "fieldName")
            .appendField("to value ");
        this.appendValueInput("value");
        this.appendDummyInput()
            .appendField(" in document ")
            .appendField(new Blockly.FieldTextInput("key"), "docKey")
        this.setInputsInline(true);
        this.setOutput(true, null);
        this.setColour(330);
        this.setTooltip('Returns the result of the update operation.');
    }
};
Creating Charts
The scriptr.io Chart Editor allows you to graph your data online, manage the graph and embed the visualization.
To create a new chart script, use the New Script drop-down list and select Google Chart. The editor opens in the workspace showing a customized version of the google chart editor. By default, a sample column chart is displayed on the right with pre-defined data.
The input data for the Google chart is returned by another script, called a data source script. You can select an existing script in your scriptr.io library from the drop-down list, or create a new script by clicking the New Script icon "+" next to the "select script" drop-down list. As soon as you select the data source script, the script gets executed and its result gets displayed in the chart. However, if the data returned by that script does not fit the format required by the selected chart, or the script encounters an error during its execution, an error message gets displayed.
Once the data source is selected, you can start customizing your chart on the fly. The Google chart Editor recommends charts based on the data you have selected to display, in the Recommended charts section.
While working with a chart, there is context checking to ensure your data matches the selected chart type. If you select a chart type and afterwards select a data source with an incompatible data format, you get a message stating they do not match. All available chart types can be viewed by selecting More next to the Recommended charts section.
The tabs on the editor's right side contain additional information. The Data tab shows information about the script along with the successful execution data output. You can click Edit Script to open the script and perform updates to the data source script.
The Embed URL tab contains the information you need to serve your chart link, or embed it in your website inside an iframe. Clicking the link will serve your chart in a new browser tab. You may need to select Allow Anonymous Requests to allow the script to be run.
From the HTML tab, you can copy the HTML source code of your chart and paste it anywhere in order to serve it. In this HTML code, you have the customization of the chart type you have selected and an AJAX call to scriptr.io to fetch your data source in order to populate your chart.
The Samples tab contains a list of data samples for testing.
Once the data source and the chart type are selected and customized, you can provide a name for your chart and save it like any other scriptr.io script. Once saved it will appear under My Scripts.
Creating Web Pages and Text Files
Our IDE simplifies the creation of multiple file types including text, HTML, JS, CSS, XML and Markdown giving you the power to visualize the data collected from your IoT devices.
In order to create files, go to New Script drop down list, then click File and select the type. The file will open with the selected type, however the extension is not added to the file name automatically upon selection; you need to add it manually e.g., homepage.html.
You can serve the created files by clicking Run. This will open a new tab that will display the file content.
Creating a Finite State Machine
To create a Finite State Machine click the New Script drop-down list then select State Machine.
From the FSM editor, you can use the controls on the left side to add states and connect them with transitions. The transitions by default return true; you can edit the script to add the conditions for the transition.
In order to view the source code of the FSM, click the Editor View icon displayed on the FSM menu on the left side of the editor.
Once you save the FSM, you can run it and view the results in the Console tab. Moreover, you can schedule the FSM to run on a specific date or recurrent. You can also subscribe it to the channels you create.
Managing your Account
From the Account menu, you can update your account information i.e., name, profile picture and password.
To access the Account menu, click on your profile picture displayed at the top-right corner of your workspace.
Managing your Application Settings
You can view and manage the settings of your active application under the Settings menu.
Access
Custom Sub-Domain
Scriptr.io provides you with the ability to access your APIs using your own custom sub-domains (e.g., mydomain.scriptrapps.io). This will allow you to call public APIs without passing the anonymous token. For instance you can serve files such as http://mydomain.scriptrapps.io/dashboard.
To add a sub-domain:
- Open the Settings menu, select the Access tab.
- Add your custom sub-domain then save.
To delete the sub-domain, you can clear the field then click the save icon.
Tokens
Under this section, you can view, regenerate and revoke tokens that were created by the system on your behalf (e.g. token used by the IDE, token used by GitHub for automatic deployments, etc.). For more information, refer to the section entitled Authentication and Security.
Configuration
CORS
CORS is a mechanism that allows cross-domain communication from HTTP clients by allowing resources on a web page in a given domain to be requested from another domain.
You can edit the field by clicking the pen icon, adding a comma separated list of domains and submitting.
Custom 403 Error File
When serving files, users might try to access a page to which they don't have access. Scriptr.io allows you to handle this scenario by specifying a custom 403 (HTTP Forbidden) error file, which can be either an HTML file to serve or a script that gets executed allowing you to perform some custom logic before serving the response to the user. For instance, as you can see in the sample script below, you might want to redirect the user to a different page displaying different information based on whether he does not have enough permissions to access the page, or he is not authenticated:
var htmlPage;

if (request.user.id == null) {
	// 403 because of anonymous request
	htmlPage = "./index.html";
} else {
	// 403 because of insufficient permissions
	htmlPage = "./permission_denied.html";
}

response.setStatus("403");
response.setHeader("location", htmlPage);
response.close();
This feature does not work when executing scripts, it only works when serving files.
Custom 404 Error File
Similar to the concept of the custom 403 error file, scriptr.io also allows you to specify a custom 404 (HTTP Not Found) error file which can either be an HTML page to serve to your users when they try to access a non-existing resource, or a script that gets executed to perform some custom logic.
Notification
Scriptr.io provides you with a mean to push notifications to any iOS and Android devices.
From the Configuration section, you can start by creating the appropriate certificates and/or FCM key and save them.
From the Groups section, you can manage groups of iOS and Android device tokens.
Configuration Sub-tab
Currently, scriptr.io provides you with three built-in configurations as listed below:
- Development Certificate for iOS
- Production Certificate for iOS
- FCM API key for Android
iOS Configuration
To attach a production or development iOS certificate, under the iOS Credentials section of the Notification tab, click Add certificate link to upload the certificate and add the relevant password before clicking the Save button.
Note that in order to use your iOS certificate with scriptr.io, make sure to export it to a Personal Information Exchange format (.p12).
Android Configuration
To save an FCM key in your scriptr.io account, go to the Android Credentials section of the Notification tab, fill in the FCM API Key and click Save. You also have the option to save a notification icon path which will be used when the message pushed does not have a payload, in which case, our push API will wrap the message with the icon path inside a notification payload as the title and icon keys respectively.
Once set up, refer to the push function in the Built-in Objects & Functions section or to the mobile-push module of the Modules section to learn how to send push notifications from your scripts.
Note that you can remove the certificates and FCM key at anytime, however, you will no longer be able to push notifications.
Groups Sub-tab
Scriptr.io gives you the ability to send real-time messages to your mobile device applications. With our group management module, you are able to add iOS and Android device tokens to a group and push notifications in batches by sending to any group.
In order to create a group of mobile device tokens, go to Settings | Notification tab then go to the Groups sub-tab.
Once you click Add Group, a row appears where you can add a unique group ID and select a configuration ID from the drop-down list. Adding and removing mobile device tokens to groups can only be done through the addToGroup and removeFromGroup APIs.
GitHub
Under this tab you can connect a GitHub repository to your scriptr.io account in order to benefit from the features described in section GitHub Integration.
Social
Under this tab, you can manage your social networks settings.
In order to call the Facebook APIs through scriptr.io, you need to specify the API Key, API Secret and the Access Token of your Facebook app.
To manage the Facebook settings, open the Settings menu, go to the Social tab, fill in the desired fields then click Save.
You can delete the settings at anytime by clicking Clear.
In order to call the Twitter APIs through scriptr.io, you need to specify the Consumer Key, Consumer Secret, Access Token and Access Token Secret of your Twitter app.
To manage the Twitter settings, open the Settings menu, go to the Social tab, fill in the desired fields then click Save.
You can delete the settings at anytime by clicking Clear.
Channels
A channel is a component over which messages are exchanged. It can serve as a topic for the publish-subscribe programming pattern or as a queue for queuing scripts to be served sequentially.
This tab allows you to:
- Manage channels and their ACLs.
- Manage bridges to connect/disconnect channels to/from external endpoints.
- Subscribe/unsubscribe scripts to channels.
External Endpoints
An external endpoint in scriptr.io is a configuration entry that defines how to connect to a remote resource. This includes setting the endpoint type (WebSocket, MQTT, AWS IoT, Azure IoT, etc.) in addition to the endpoint name and other endpoint-specific information such as authentication settings.
To create a new external endpoint, click on the "+" sign near "Add External Endpoint Configuration". Select an endpoint type from the first field, then specify a name, URL and port to connect to. Depending on the type you have chosen, you will need to fill different additional configuration fields, mostly related to authentication (e.g. username, password, access key, etc.).
To edit an existing external endpoint, just click on the pencil icon near the endpoint's definition. To remove an existing external endpoint, click on the trash can icon near the endpoint's definition. Note that you cannot delete external endpoints that are used by active bridges.
Device Directory
Controlling access to your scriptr.io application can be achieved by using the Device Directory which provides token and device management capabilities. To do that, go to the Tools menu and select Device Directory. A dialog opens showing two tabs - Devices and Groups - that are described below.
Devices
This tab lists all the devices available in your account, such as scriptr.io which is your first device created at registration time.
The token of the scriptr device identifies you as the owner of the application and is used by the system when running and serving scripts and files through the IDE.
The Devices tab allows you to:
- Add more devices and tokens — to control who has access to your application.
- Delete devices — to permanently prevent access to your application using their tokens.
- Edit the description of your devices.
- Assign or remove devices to/from groups.
- Suspend or activate devices — upon creation devices are active. Suspending devices will temporarily prevent access to your application using their tokens until you re-activate them.
- Regenerate devices tokens — regenerating a token will overwrite and invalidate the current one.
Groups
A group is a collection of devices, to whom you might want to grant the same permissions. While access to your application can be granted on a per device basis, the purpose of a group is to make management more convenient when working with a large number of devices.
The Groups tab lists all your groups and allows you to:
- Add groups — the groups that you create here will appear in the Access Control List dialog.
- Delete groups — deleting a group will not delete its devices, it will remove them from it and they will lose any permissions that were granted to the group.
- Edit groups — to update their names. Any devices that were members of the group and any permissions that were granted to it before editing will remain.
- Manage the members of groups — by assigning or removing devices. The members of a group are granted the group's permissions. When you remove a device from a group it will automatically lose any permissions that were given to that group.
Access Control List
Scriptr.io gives you full control on who can use your application by allowing you to configure an access control list for all your API endpoints.
You can open the Access Control List dialog by clicking the icon  on the top right of any of your editors. It allows you to configure which tokens can be used to run a script or serve a file depending on the type of the API endpoint.
Although you can grant permissions on a per device and per group basis, scriptr.io provides three additional predefined groups:
| authenticated | Grants access to all authenticated devices, i.e. any request with a valid token that belongs to any of your scriptr.io devices can execute the API endpoint. |
|---|---|
| anonymous | Grants anonymous access to the specified API endpoint, i.e. anyone can execute the API endpoint without having to pass any tokens by calling it on your sub-domain. However, the Anonymous Token should be passed in the request if it is called on the public domain (https://api.scriptrapps.io/). |
| nobody | Denies access to the specified API endpoint, i.e. the API endpoint cannot be executed even when using your scriptr token from the IDE. |
The Access Control List icon will change according to whether or not access is restricted:
 | Access to the specified resource is restricted to a list of devices. |
 | Anyone can run or serve the resource. |
By default, the ACLs of any new endpoints are configured to be the scriptr device, except for Google Charts and files that are granted anonymous access upon creation.
When you require a script within another script using the require() statement, its ACL gets ignored and it gets executed with "super user" privileges. For instance, if you have a script with its ACL set to nobody, and you require it inside another script, it will execute normally when its parent script gets executed.
When you schedule a script, its ACL gets ignored upon execution as it runs with "super user" privileges.
Installing Modules
The Install Modules tool allows you to extend your scriptr.io modules by adding your own. You can either pick from the wide array of modules distributed by scriptr.io or you can easily import your own from GitHub. In the list of modules provided by scriptr.io you will find:
- Connectors allowing you to integrate and orchestrate different APIs offered by a large range of IoT providers. See the full scriptr.io connector list here.
- Open source JavaScript libraries modified to work with scriptr.io.
To manage your modules, use the New Script menu, choose Install Module, and you will see the list of available modules.
To install a module from the list, simply click Install and it will be automatically installed in your scripts library under the modules folder.
To import a module that is not in the list, you can import it from GitHub by clicking Add Custom Module from GitHub, fill in the repository details along with the destination folder under which the repository scripts will be installed, and click Install. It will be imported under the destination folder that you specify.

Once installed, you will be able to locate the new modules in the My Scripts tree under the modules folder in case it is provided by scriptr.io, or the user specified folder in case it is custom. It can be used the same as other scriptr.io scripts, i.e. using the require("module_name") built-in function where module_name is the module's folder name including its path.
Terminal
The terminal is a scriptr.io debugging tool that provides a rich set of commands for invoking endpoints using different protocols and options. It can be used to invoke endpoints on different scriptr.io accounts by simply changing the token using the set command. By default, it is set to the hosting account's token. You can access the Terminal from the Tools menu.
| Command | Description |
|---|---|
| about | Displays information about the scriptr.io terminal. |
| clear | Clears the terminal. |
| delete | Invokes an endpoint using the DELETE HTTP method. |
| echo | Outputs its argument to the terminal. |
| get | Invokes an endpoint using the GET HTTP method. |
| help | Provides information about the provided command. If no argument is passed, it lists all available terminal commands. |
| history | Shows the list of recently entered commands. |
| mapCommand | While you're debugging, you may find that you are invoking an endpoint frequently with a complex sequence of parameters. To save yourself time, assign the sequence of parameters to the ordered arguments to be passed to your endpoints by using the mapCommand command. After doing so you will be able to invoke an endpoint using the POST HTTP method by simply typing its name followed by the ordered list of arguments corresponding to the parameters you previously mapped. Note that this mapping only lasts for the time of the session. |
| option | Invokes an endpoint using the OPTION HTTP method. |
| patch | Invokes an endpoint using the PATCH HTTP method. |
| post | Invokes an endpoint using the POST HTTP method. |
| put | Invokes an endpoint using the PUT HTTP method. |
| set | Sets the token to be used by the terminal when invoking scriptr.io endpoints. |
| theme | Changes the terminal theme and sets it to the passed argument. The argument value can either be white or default. |
| ws | Invokes an endpoint using a WebSocket connection. |
| <endpoint> | Invokes the <endpoint> using the POST HTTP method. For instance, invoking a script called HelloDevice that takes a parameter called myName can be done as follows: HelloDevice -d {"myName" : "John"} |
For help on using each of the above listed commands, just type "help <command>" in the terminal and it will display its description, list of supported arguments along with an example on how to use it.
To configure your terminal, create a text file on your root folder and call it Autoexec.terminal. Any commands it contains will get automatically executed upon loading the terminal. You can use this feature, for instance, to set your favorite theme, use a specific token or map command arguments.
Organizing Your Code
Scriptr.io allows you to store an arbitrary number of scripts and organize them into folders and folders hierarchy.
- When naming your script, add the path of the folders before its name and the folder hierarchy will be created if it doesn't exist (e.g., folder1/folder2/scriptname). Note that a script can be created inside a hierarchy of maximum 5 folders.
- You can put an existing script into a folder or move it from one folder to another by simply renaming it using the above notation.
- As soon as you save the script, your list of scripts (left side of the screen) gets updated with the corresponding folder structure.
Running Your Script and Viewing the Result
Once you are done implementing your code and have saved it, just click Run button on the top of the code editor to run the script. The result is displayed in the console underneath the code editor.
From the console you can see:
- The curl instruction that can be used to trigger your script from a remote HTTP client.
- The messages logged in your script.
- The response returned by your script.
- The history of all the preceding executions of this script.
Passing Request Parameters from the IDE
Another cool feature of the scriptr.io IDE is that you can dynamically pass request parameters to your script before running it.
- Click the drop-down arrow at the right of the Run button, then click Run...
- Enter the expected parameter names and values. You can add more parameters by clicking the plus icon "+"
- Once done, click Run to execute your script

Tip
If you need to send an array of parameters, just click the "+" sign to add the same field name multiple times with different values.
Script Scheduling
The Script Scheduler enables you to automatically perform routine tasks by running a chosen script. It can be used to execute scripts at specific times or on a recurrent schedule.
You cannot add more than 5 triggers per script.
To schedule a script, click Schedule and then click Add Trigger from the dialog. Once you start adding a new trigger you will get the following two options:
- Run On: this defines a one-time schedule. A calendar opens allowing you to pick a specific date and time for this trigger.
- Run Every: this defines a recurring schedule. You have two modes for entering the recurrent schedule information as described below:
- Basic: it is selected by default. In this mode you can visually select the recurrence period such as every hour, day, etc... You can choose multiple dates and times for a recurrent cron job.
- Advanced: you can switch to this mode by clicking the Advanced link displayed on the right side. In the advanced mode you can enter a cron expression to create a schedule which is a string made up of 5 or 6 space separated fields. The cron expression determines at what time intervals the script will run; its specs as well as some examples are described in the following sections.
When a script is scheduled, a clock icon appears next to its name in the My Scripts tab tree.
- If you rename or delete a scheduled script, all the cron jobs associated with that script will be deleted.
- Some advanced cron expressions cannot be displayed in basic mode.
Cron Expression Specs
The cron expression fields' definitions are as follows:
| Field Name | Mandatory | Allowed Values | Allowed Special Characters |
|---|---|---|---|
| Minutes | YES | 0-59 | , - * / |
| Hours | YES | 0-23 | , - * / |
| Day of Month | YES | 1-31 | , - * ? / L W |
| Month | YES | 1-12 or JAN-DEC (case insensitive) | , - * / |
| Day of Week | YES | 1-7 or SUN-SAT (case insensitive) | , - * ? / L # |
| Year | NO | empty, 1970-2099 | , - * / |
The definitions of the special characters are as follows:
| Special Character | Definition | Example |
|---|---|---|
| * | Used to select all values. | * in the hours fields means every hour. |
| ? | Used when no specific value is required. | If 15 is used in the day of month field and ? is used in the day of week field, it means that the trigger will fire on the 15th irrespective of the day of week. |
| - | Used to specify ranges. | 5-8 means every hour between 5 and 8, inclusive. |
| , | Used to specify several values. | MON,WED,FRI means that the trigger will fire on Mondays, Wednesdays, and Fridays. |
| / | Used to specify increments. When no value is specified before the / it is equivalent to having 0. | 5/20 in the minutes field means that the trigger will fire at minutes 5, 25, and 45. /6 in the hours field means that the trigger will fire at hours 12 AM, 6 AM, 12 PM, and 6 PM. |
| L | Used to refer to the Last value in the field's allowed values. | 6L in the day of week field means the last Friday of the month. L in the day of month field means the last day of the month. |
| W | Used to specify the Weekday nearest to the specified day. | If 14W is specified, and the 14th is a Tuesday, it fires on Tuesday. However, if it is a Saturday it fires on Friday the 13th, and if it's a Sunday it fires on Monday the 15th. Note that if you specify 1W and the 1st is a Saturday, it fires on Monday the 3rd, as it does not jump to another month. |
| # | Used in the day of week field to specify the nth day of the month. | 2#4 in the day of week field means the 4th Monday of the month. |
Cron Expression Examples
| Expression | Meaning |
|---|---|
| 0 0 * * ? | Fire at midnight every day. |
| 30 18 ? * * | Fire every day at 6:30 PM. |
| 43/5 * * * ? 2015 | Fire every hour at minutes 43, 48, 53 and 57 in 2015. |
| /10 15,20 * * ? | Fire every 10 minutes starting at 3 PM and ending at 3:50 PM; and fire every 10 minutes starting at 8 PM and ending at 8:50 PM, every day. |
| 20 9 ? * TUE-THU | Fire at 9:20 AM every Tuesday, Wednesday and Thursday. |
| 45 13 ? * 7L | Fire at 1:45 PM on the last Saturday of every month. |
| 30 10 ? * 4#1 | Fire at 10:30 AM on the first Wednesday of every month. |
Note that you can also schedule a script using the built-in schedule function.
GitHub Integration
You can connect your account to GitHub to benefit from its source control capabilities and enable team collaboration on your scriptr.io account.
To configure the GitHub integration refer to the GitHub section below.
Synchronize View
You can use the Synchronize view to track the state of your shared resources in the context of a GitHub repository, and manage your changes. This view offers the following benefits:
- The modification state of the resources on scriptr.io is always up to date. In other words, any modification made to the resources from within the Workspace, will be reflected in the Synchronize view automatically.
- The states of the resources on the remote GitHub repository can be reflected in this view by clicking the Refresh button in the toolbar.
Each item in the view will have an icon explaining its state as described below:
| Icon | Description |
|---|---|
| Outgoing | |
| The file has been added to scriptr.io; it will be created on GitHub if you commit. |
| The file has been removed from scriptr.io; it will be deleted from GitHub when you commit. |
| The file has been modified in scriptr.io; it will be updated in GitHub when you commit. |
| Incoming | |
| The file has been added to GitHub; it will be added to scriptr.io when you update. |
| The file has been removed from GitHub; it will be deleted from scriptr.io when you update. |
| The file has been modified in GitHub; it will be updated in scriptr.io when you update. |
| Conflicting | |
| The file has been modified in scriptr.io and in GitHub. You need to resolve the conflict manually before you can commit/update. Alternatively, you can choose to update and override the scriptr.io Working Copy with the GitHub Copy. |


The Synchronize view supports the following 4 modes:
| Mode | Description |
|---|---|
| Incoming Mode | This mode filters the view to show the incoming changes. |
| Outgoing Mode | This mode filters the view to show the outgoing changes. |
| Conflicting Mode | This mode filters the view to show the conflicting changes only. |
| Outgoing/Incoming Mode | This mode displays all the incoming and outgoing changes. |
Automatic Deployment
When you connect to your GitHub account from Settings | GitHub tab, you can enable automatic deployment. Once enabled, a full deployment of your entire GitHub repository will be triggered to your scriptr.io account in the following two scenarios:
- When committing a change to GitHub while having the @AUTO-DEPLOY keyword anywhere in the the comment field.
- When triggering a GitHub deployment event.
To disable it, go to Settings | GitHub tab and click Disable Automatic Deployment.
The Purge feature is ON by default, which means that any scriptr.io files that are not in your GitHub repository will get deleted during automatic deployments. However, you can turn it OFF from your Settings | GitHub tab.
Compare Editor
The compare editor allows you to compare and merge differences between the resource version that you have locally on scriptr.io with the one that you have on your GitHub repository. In the Synchronize view, you can double-click a file to open it in the Compare Editor where you will see the following:
- The working copy on the left side, and the GitHub copy on the right side.
- A metadata section that contains scriptr.io specific information about the resource, such as ACLs and content type.
- Changes in the file are highlighted as follows:
- Green highlights outgoing changes.
- Orange highlights incoming changes.
- Red highlights conflicting changes.
Subscribing Scripts to Channels
The publish-subscribe feature in scriptr.io allows a script to subscribe to a channel. Whenever a message gets published to this channel, the subscribed scripts will get triggered, and the message will be available in the request.rawBody property.
There are two ways of subscribing a script to a channel:
- Through the Channel tab by clicking the script icon
 .
. - Through the subscription dialog by clicking Subscribe
 which can be accessed from the script editor. The subscription dialog will list all the available channels allowing you to switch the ON/OFF button in order to subscribe/unsubscribe your script.
Note that you can subscribe/unsubscribe scripts via the scripting pubsub module.
Connecting to Remote Endpoints Using Bridges
A scriptr.io bridge is a connector that receives data from a remote endpoint (previously configured in the External Endpoint tab) and publishes it to a scriptr.io channel. Once published, the data can be consumed by any subscribers on that channel.
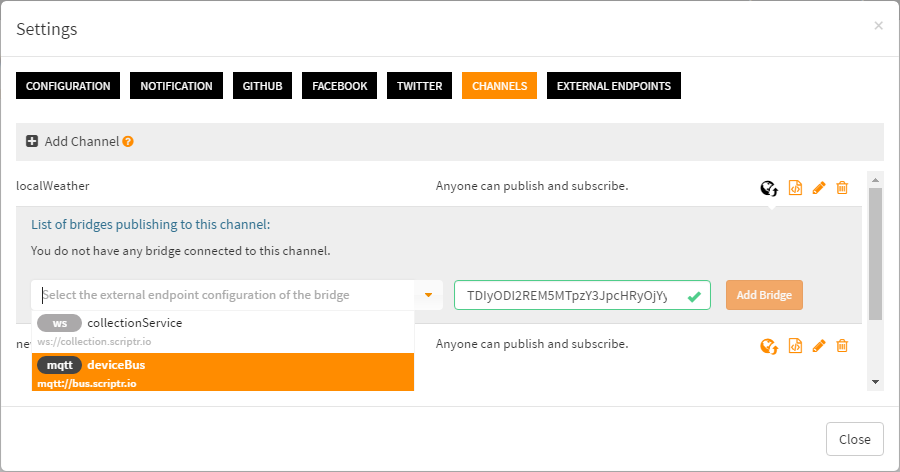
To create a bridge, all you need to do is go to the Channels tab then click on the Manage Bridges icon ![]() next to any channel as shown in the screenshot below. You will be requested to select an external endpoint from the list of configurations you provided in the External Endpoints tab and to specify the scriptr.io token that will be used to publish the received data to your channel.
next to any channel as shown in the screenshot below. You will be requested to select an external endpoint from the list of configurations you provided in the External Endpoints tab and to specify the scriptr.io token that will be used to publish the received data to your channel.
Built-in Objects & Functions
Below are all the built-in objects and functions that are directly available in your scripts without having to require them.
console
The console logger is a scriptr.io built-in object used to debug your scripts allowing you to output your logs directly to the console.
The available logging functions are error(), warn(), info(), log() and debug() (note that the info and log functions have the same log level). You will also need the setLevel() function that allows you to control the minimum level that will be output to the console. By default, the level is set to DEBUG.
console.setLevel("INFO"); //levels are ERROR | WARN | INFO | DEBUG | OFF

console.error("This is the error message of the script");
console.warn("This is the warning message of the script");
console.info("This is the info message of the script");
console.debug("This is the debug message of the script");
isGroupInAcl
This built-in function checks if a group is granted permission by a specific ACL.
| Parameter | Description |
|---|---|
| groupId | String representing a group name. |
| acl | String representing an ACL policy, which consists of a semi-colon separated list of users, devices and/or groups. |
Returned result: a boolean value specifying whether or not the group is granted permission.
return isGroupInAcl("subscribers", require("pubsub").getChannel("myChannel").result.subscribeACL);
isIdInAcl
This function checks if a device or user is granted permission by a specific ACL.
| Parameter | Description |
|---|---|
| id | String representing a user or device identifier. |
| acl | String representing an ACL policy, which consists of a semi-colon separated list of users, devices and/or groups. |
Returned result: a boolean value specifying whether or not the resource is granted permission.
var pubsub = require("pubsub");
// Check if the current user has permission to publish messages to the channel called "myChannel"
if (isIdInAcl(request.user.id, pubsub.getChannel("myChannel").result.publishACL)) {
    // publish message to "myChannel"
    pubsub.publish("myChannel", "Hello Device!");
}
jsonToXml
This function converts a JSON object or string to an XML string.
| Parameter | Description |
|---|---|
| json | A JSON object or string to be converted to an XML string. |
Return value: an XML string.
publish
Publishes a message to a specified channel that will be sent to its subscribers.
Parameter | Description |
|---|---|
| channelName | String representing the name that serves as a unique identifier for the channel. |
| message | JSON, including objects, strings, and numbers, representing the message to be distributed to subscribers. |
Return value: no result is returned. In case of a failure the appropriate error code and details will be returned in the metadata property (refer to common function response).
return publish("myChannel", "Hello Device!");
push
The built-in push function empowers your scripts to push notifications to iOS and Android devices.
| Parameter | Description |
|---|---|
| devices | Array of device tokens to which you want to send the notification to. |
| message | String representing the payload containing the notification message to be sent. For iOS payload details, please refer to the The Notification Payload tutorial. For Android, the payload needs to be sent in the following format '{\"key1\":\"value1\",\"key2\":\"value2\", ...}'. |
| platform | The targeted platform, i.e. the platform of the devices (iOS or Android). |
| isProduction | This parameter is ignored if the notification is meant to be sent to some Android devices and will only be taken into consideration for iOS devices. It is a boolean value indicating if the push notification should be sent to your production or development application. Defaults to true. |
Return value: no result is returned. In case of a failure the appropriate error code and details will be returned in the metadata property (refer to common function response).
Start by setting up your account and then simply follow these examples:
var message = '{"aps": { "alert" : "The notification you want to send", "badge" : 5, "sound" : "default"}}';
var arrayDevices = ["45866802973125d73b144b6c5d9c17b24fb4b09cf4d7bff855e2dd8e852a49c6","4565656d3423e455b45355c34243f3553f3255b235352c55454dd3255e324b24"];
var deviceType = "ios";

//this is a push to iOS using the development certificate.
var isProduction = "false";
return push(arrayDevices, message, deviceType, isProduction);

//this is a push to iOS using the production certificate.
isProduction = "true";
return push(arrayDevices, message, deviceType, isProduction);
var message = '{"Content":"The notification you want to send"}';
var arrayDevices = ["APA91bHBCTUA8vITavb-yaB2xZlB93xQB1WcquAyzYBjSAJpiEWslvjl-er-1kdvO2VVu52CpgI-ATcMrMs7rKnjInKO2di7pR9njJLJQxd4AK4vpZvGgkxQB2G5fVurKJgiwFKi7Zyyatd0lVy_8GnhieEHUMUbhagURgSTJ7l-dBES00H2eVI"];
var deviceType = "android";
return push(arrayDevices, message, deviceType);
pushToGroup
The built-in pushToGroup function allows you to push notifications directly from within a script to iOS and Android devices, by passing the following parameters:
| Parameter | Description |
|---|---|
| groupId | String representing the identifier for sending push notifications to a particular mobile application. |
| message | String or JSON representing the message you want to send to the devices through your application. |
Return value: no result is returned. In case of a failure the appropriate error code and details will be returned in the metadata property (refer to common function response).
For information about how to create a group of mobile device tokens, see section Groups Sub-tab.
request
You can use the request built-in object to retrieve the HTTP request parameters as well as other useful information.
| Property | Description |
|---|---|
| files | A map containing file objects representing the files sent as request's parameters. Each file object has the following attributes: "paramName", "fileName", "size", "contentType", and "content". |
| headers | A map containing the HTTP request headers: "host", "content-length", "accept", "origin", "user-agent", "authorization", "content-type", "referrer", "accept-encoding", "accept-language", "x-forwarded-for", "x-forwarded-scheme", "connection". |
| id | Request identifier. |
| method | Name of the HTTP method used for the request. |
| parameters | A map containing the request's parameters. |
| pathInfo | String containing the part of the URI starting after the script name. |
| queryString | Query string passed to the request. |
| rawBody | The HTTP request body that carries the actual message data. |
| scriptName | String representing the script name. |
| URI | String containing the request URI starting from the script name. |
require
The built-in require function allows you to include a module inside your script in order to be able to use its functions and objects. Refer to the modules section for more details.
| Parameter | Description |
|---|---|
| moduleName | The name of the module to include in the current script. |
When adding a core module to your script, you should require it by name (i.e., require("http")) while requiring your own modules should be done by specifying an absolute path (i.e., require("/myOwnModule")) or the relative path (i.e., require("../../anotherModule") ).
// require the "http" module
var http = require("http");
// After requiring the module "http" you can use its function "request"
var response = http.request({"url": "http://api.openweathermap.org/data/2.5/weather","params": {"q":"london,uk"}});
return response;
response
You can use the response built-in object to intercept the HTTP response stream and manipulate it before it gets sent to the client. However, make sure to set the response CORS headers whenever you call any of the response object's methods.
response.write("hello");
// whenever you manipulate the response object make sure to add your CORS settings to the header
response.addHeaders(configuration.crossDomainHeaders);
response.close();
The response object supports the following methods:
addHeaders
This method allows adding a set of headers to the response.
| Parameters | Description |
|---|---|
| headers | Map of HTTP response headers represented as a JSON object. |
close
This method flushes the data to the stream then closes it. No data can be written to the response after this operation.
flush
This method flushes the output stream and forces any buffered output bytes to be written out.
setHeader
This method allows setting the value of a specified response header.
| Parameters | Description |
|---|---|
| name | String representing the header name. |
| value | String representing the header value. |
setStatus
This method allows setting the status code of the response.
| Parameters | Description |
|---|---|
| status | Integer representing the HTTP response status code. |
write
This method allows writing a string to the body of the response.
| Parameters | Description |
|---|---|
| body | String representing the body content of the response. |
runAs
By default, everything you do within a script runs with owner privileges. However, if you wish to execute APIs using limited privileges, you can wrap your code inside a function, pass it to runAs() and specify the ID of the device that will be used to invoke that code.
| Parameter | Description |
|---|---|
| function | Function wrapping the code you need to run using the privileges of the device with the specified id. |
| id | String representing the ID of the device to be used to run the function. |
Return value: null.
/* In the following example, executing this script as the scriptr device will succeed.
 * However, if you use a different device that doesn't have the permission to save a document in the DefaultStore,
 * the documents.create() function will fail with a PERMISSION_DENIED exception.
 */

var documents = require("document");
var stores = require("store");

// Retrieve the id of the device issuing the request
var userId = request.user.id;

// Update the ACL on the DefaultStore to allow the scriptr device to create documents
stores.update("DefaultStore", {"saveDocumentACL":"scriptr"});

// The code wrapped in the following function will be executed using the privileges of the device issuing the request (userId)
runAs(function(){

// Create a document with the privileges of the device issuing the request
 documents.create({"myfieldName":"value"});

}, userId);
schedule
The built-in function schedule allows you to schedule a script to be executed at a specific date or periodically at fixed dates or intervals. Scheduling a script creates a document in the "DefaultStore" store representing the trigger for the script.
| Parameter | Description |
|---|---|
| scriptName | String representing the name of the script to execute. |
| trigger | String or Date object indicating when the script will be executed. The script can be scheduled to run at a specific date by passing a Date object or a date string with an ECMA standard ISO date format yyyy-MM-dd'T'HH:mm:ss.SSS'Z' (ex. 2015-09-08T14:28:41.093Z). Alternatively, it can be scheduled to run periodically at fixed dates or intervals by passing a string representing a cron expression. |
Return value: handle to the trigger which can be used later to cancel it. In case of a failure the appropriate error code and details will be returned in the metadata property (refer to common function response).
schedule("myScript", "2016-09-08T14:28:41.093Z"); // "myScript" will run on the 8th of September 2016 at 14:28 UTC
schedule("myScript", "30 7 ? * MON-FRI"); // "myScript" will run every weekday at 7:30 AM
sendMail
The built-in sendMail function allows you to easily send emails from your scripts by directly calling it using the following parameters:
| Parameter | Description |
|---|---|
| to | Recipient's email address. |
| fromName | Sender's name e.g., John Smith. |
| subject | Email's subject. |
| body | Email's body (sent as content type text/html). |
Return value: no result is returned. In case of a failure the appropriate error code and details will be returned in the metadata property (refer to common function response).
var time = new Date();
var mailBody = "Hello,<br>An intrusion was detected at " + time + "<br>";
mailBody += "<a href='https://api.scriptrapps.io/discard?id=" + request.id + "'>Click here to discard the alert</a>";
var emailConfig = {
  "to": "joe.developer@scriptr.io",
  "fromName": "Joe",
  "subject": "Intrusion alert",
  "body": mailBody
};
return sendMail(emailConfig.to, emailConfig.fromName, emailConfig.subject, emailConfig.body);
storage
script.io provides developers with means to persist data from their scripts using the built-in storage object that exposes two levels of persistence: local and global.
| Property | Description |
|---|---|
| local | Allows you to store data that is only available to the script that persisted the data. |
| global | Allows you to store data that is available to all your scripts. |
Local Storage
The local storage is accessible through "storage.local". To manipulate data contained in the local store of a script use the following notations:
// we persist (create/update) the "vehicleCount" field
// in the local storage
storage.local.vehicleCount = 100;
// we read the persisted "vehicleCount" field
// from the local storage
var vehicles = storage.local.vehicleCount;
// we delete the "vehicleCount" field
// from the local storage
delete storage.local.vehicleCount;
var vehiclesPerSecond = request.parameters.vehiclesPerSecond;
var lastCount = storage.local.lastCount;
if (lastCount && lastCount < vehiclesPerSecond) {
	storage.local.lightDuration = storage.local.lightDuration - 10;
}
if (lastCount && lastCount > vehiclesPerSecond) {
	storage.local.lightDuration = storage.local.lightDuration + 10;
}
broadcast(storage.local.lightDuration);
storage.local.lastCount = vehiclesPerSecond;
return storage.local.lastCount;

function broadcast(value) {
	// broadcast this value to all traffic lights
}
Global Storage
The global storage is accessible through storage.global. To manipulate global fields within your scripts use the following notations:
// we persist (create/update) the "traffic" field
// in the global storage
storage.global.traffic = new Array();
// we read the persisted "traffic" field
// from the global storage
var traffic = storage.global.traffic;
// we delete the "traffic" field
// from the global storage
delete storage.global.traffic;
var vehiclesPerSecond = request.parameters.vehiclesPerSecond;
var lastCount = storage.local.lastCount;
if (lastCount && lastCount < countOfVehiclesPerSecond) {
  	storage.local.lightDuration = storage.local.lightDuration - 10;
}
if (lastCount && lastCount > countOfVehiclesPerSecond) {
	storage.local.lightDuration = storage.local.lightDuration + 10;
}
broadcast(storage.local.lightDuration);
storage.local.lastCount = vehiclesPerSecond;
// We need to persist the evolution of the traffic as a global field, i.e. shared by all scripts
if (!storage.global.traffic) {
  storage.global.traffic = new Array();
}
var data = {
  "time": new Date().getHours(),
  "vehicles": storage.local.lastCount
}
var traffic = [data].concat(storage.global.traffic);
storage.global.traffic = traffic;
return storage.local.lastCount;

function broadcast(value) {
	// broadcast this value to all traffic lights
}
tweet
The built-in tweet function allows you to tweet directly from within a script by passing the following parameter:
| Parameter | Description |
|---|---|
| tweetString | String representing the new status to post to Twitter using the app's credentials configured in your Settings. |
Return value: JSON object containing the result of the tweet. In case of a failure the appropriate error code and details will be returned in the metadata property (refer to common function response).
unschedule
The built-in function unschedule deletes the script's trigger corresponding to the unique handle passed as a parameter. A handle to a script's trigger is returned by the schedule function upon scheduling this script. Deleting a script's trigger removes its associated document from the "DefaultStore" store.
| Parameter | Description |
|---|---|
| handle | String representing the script's trigger to be deleted. |
Return value: no result is returned. In case of a failure the appropriate error code and details will be returned in the metadata property (refer to common function response).
unschedule("5B1EB7D483D3CEE3B443AA841607C132");
xmlToJson
This function converts an XML string to a JSON object.
| Parameter | Description |
|---|---|
| xml | XML string to be converted to a JSON object. |
Return value: JSON object.
Modules
script.io is built with modular design in mind. A module is a reusable piece of software that defines variables, functions and/or objects that you can require and use in your own scripts. While some of the modules you will be using are provided by scriptr.io or other third parties, called the core modules, you also have the possibility to create your own modules which are regular scriptr.io scripts. The difference with other scripts is that it should not be directly invoked through HTTP requests and hence, they usually expose fields, functions or classes only.
In order to add a module to your script, i.e., be able to use the functions and/or objects it defines, just use the require("module") instruction.
function HomeAutomationManager() {
  this.rooms = [
    {"master": {"temperature": 22, "light": false}},
    {"kids": {"temperature": 22, "light": false}},
    {"living": {"temperature": 22, "light": false}}
  ];
  this.doors = [{"font":false}, {"garage":false}];
}
HomeAutomationManager.prototype.getReport = function() {
  return "Rooms: " + "\n" +  JSON.stringify(this.rooms) + "\nDoors:\n" + JSON.stringify(this.doors);
}
var homeAutomation = require("./homeAutomation");
var homeAutomationMgr = new homeAutomation.HomeAutomationManager();
return homeAutomationMgr.getReport();
Note that most scriptr.io functions return a JSON object with the following two properties:
- result: containing the actual return result of the function.
- metadata: containing the status of the operation and any error details in case of failure.
{
	"result" : {
		"device" : {
			"id" : "AB825CE1520F"
		}
	},
	"metadata" : {
		"status" : "success"
	}
}
{
	"metadata" : {
		"status" : "failure",
		"statusCode" : 400,
		"errorCode" : "INVALID_PARAMETER_VALUE",
		"errorDetail" : "Invalid value for fieldName [acl]."
	}
}
bridge Module
In scriptr.io, a bridge is a connector that receives data from a remote endpoint (previously configured in the External Endpoint tab) and publishes it to a scriptr.io channel. Once published, the data can be consumed by any subscriber on that channel.
The bridge module provides scripting functions for managing your bridges.
The Bridge feature is a premium add-on that is disabled by default on the free-mium tier.
create
Creates a bridge that receives data from an external endpoint and publishes it to a scriptr.io channel using the specified token. If the Bridge feature is not enabled on the account, the error "BRIDGES_DISABLED" is returned.
Note that during your free trial period, you can only have one active bridge at a time.
Parameter | Description |
|---|---|
externalEndpointConfiguration | String representing the name of an external endpoint configuration (previously created in the External Endpoint tab). |
| channel | String representing the name of the channel that will receive the data pulled from the external endpoint. |
| token | String representing the user/device token that will be used by the bridge to publish data to the channel. |
Return value: JSON object containing the "id" of the created bridge, as well as the "externalEndpointConfiguration", "channel" and "token" that were used to create it. In case of a failure the appropriate error code and details will be returned in the metadata property (refer to common function response).
var bridge = require("bridge");

return bridge.create("myConfigurationName", "myChannelName", "QUNDT1VOVEtFWTp1c2VyTmFtZTpteXRva2Vu");
{
	"result" : {
		"id" : "<YOUR_BRIDGE_ID>",
		"channel" : "myChannelName",
		"token" : "QUNDT1VOVEtFWTp1c2VyTmFtZTpteXRva2Vu",
		"externalEndpointConfiguration" : "myConfigurationName"
	},
	"metadata" : {
		"status" : "success"
	}
}
delete
Deletes a bridge by ID. If the Bridge feature is not enabled on the account, the error "BRIDGES_DISABLED" is returned.
Parameter | Description |
|---|---|
id | String representing the unique identifier of the bridge to be deleted. |
Return value: no result is returned. In case of a failure the appropriate error code and details will be returned in the metadata property (refer to common function response).
var bridge = require("bridge");

return bridge.delete("<YOUR_BRIDGE_ID>");
get
Retrieves a bridge by ID. If the Bridge feature is not enabled on the account, the error "BRIDGES_DISABLED" is returned.
Parameter | Description |
|---|---|
id | String representing the unique identifier of the bridge to be retrieved. |
Return value: JSON object containing the "id" of the retrieved bridge along with its properties and status information. In case of a failure the appropriate error code and details will be returned in the metadata property (refer to common function response).
var bridge = require("bridge");

return bridge.get("<YOUR_BRIDGE_ID>");
{
   "result":{
      "id":"<YOUR_BRIDGE_ID>",
      "channel":"myChannel",
      "status":"Up 10 seconds",
      "state":"running",
      "token":"QUNDT1VOVEtFWTp1c2VyTmFtZTpteXRva2Vu",
      "externalEndpointConfiguration":"myEndpoint"
   },
   "metadata":{
      "status":"success"
   }
}
list
Lists all bridges that match the conditions passed in the provided filter. If the Bridge feature is not enabled on the account, the error "BRIDGES_DISABLED" is returned.
Parameter | Description |
|---|---|
filter | JSON object containing the parameters to be sent along with the list request. |
The filter object properties are as follows:
| Property | Description |
|---|---|
| count | Boolean specifying whether or not to return the total count of bridges matching the filter. Optional, defaults to false. |
| resultsPerPage | Numeric value that determines the number of bridges per page to return. Optional, defaults to 50. |
| pageNumber | Numeric value representing the number of the page to be returned. Optional, defaults to 1. |
| channel | String representing the name of an existing channel. If passed, only bridges publishing to this channel will be listed. Optional. |
| externalEndpointConfiguration | String representing the name of an existing external endpoint configuration. If passed, only bridges subscribed to this external endpoint will be listed. Optional. |
Return value: JSON object containing the array of bridges matching the specified filter. In case of a failure the appropriate error code and details will be returned in the metadata property (refer to common function response).
var bridge = require("bridge");
return bridge.list();
var bridge = require("bridge");
var filter = {
                "count":true,
                "resultsPerPage": 2,
                "pageNumber": 1,
                "channel":"myChannel",
                "externalEndpointConfiguration":"myEndpoint"
            };

return bridge.list(filter);
{
   "result":{
      "count":"2",
      "bridges":[
         {
            "channel":"myChannel",
            "token":"QUNDT1VOVEtFWTp1c2VyTmFtZTpteXRva2Vu",
            "externalEndpointConfiguration":"myEndpoint",
            "creationTime":"2019-09-05T05:31:01.232Z",
            "lastModifiedTime":"2019-09-05T05:31:01.232Z",
            "id":"<YOUR_FIRST_BRIDGE_ID>"
         },
         {
            "channel":"myChannel",
            "token":"QUNDT1VOVEtFWTp1c2VyTmFtZTpteXRva2Vu",
            "externalEndpointConfiguration":"myEndpoint",
            "creationTime":"2019-09-16T15:32:01.242Z",
            "lastModifiedTime":"2019-09-25T10:31:07.272Z",
            "id":"<YOUR_SECOND_BRIDGE_ID>"
         }
      ]
   },
   "metadata":{
      "status":"success"
   }
}
listStatuses
Lists the bridges and information about their states if they match the conditions passed in the provided filter. If the Bridge feature is not enabled on the account, the error "BRIDGES_DISABLED" is returned.
Parameter | Description |
|---|---|
filter | JSON object containing the parameters to be sent along with the listStatuses request. |
The filter object properties are as follows:
| Property | Description |
|---|---|
| count | Boolean specifying whether or not to return the total count of bridges matching the filter. Optional, defaults to false. |
| resultsPerPage | Numeric value that determines the number of bridges per page to return. Optional, defaults to 50. |
| pageNumber | Numeric value representing the number of the page to be returned. Optional, defaults to 1. |
| channel | String representing the name of an existing channel. If passed, only bridges publishing to this channel will be listed. Optional. |
| externalEndpointConfiguration | String representing the name of an existing external endpoint configuration. If passed, only bridges subscribed to this external endpoint will be listed. Optional. |
Return value: JSON object containing the array of bridges matching the specified filter along with their respective states ("created", "restarting", "running", "removing", "paused", "stopped" and "dead") and statuses. In case of a failure the appropriate error code and details will be returned in the metadata property (refer to common function response).
var bridge = require("bridge");
return bridge.listStatuses();
var bridge = require("bridge");
var filter = {
                "count":true,
                "resultsPerPage": 2,
                "pageNumber": 1,
                "channel":"myChannel",
                "externalEndpointConfiguration":"myEndpoint"
            };

return bridge.listStatuses(filter);
{
   "result":{
      "count":"2",
      "bridges":[
         {
            "channel":"myChannel",
			"state":"stopped",
			"status":"Exited (0) 1 week ago",
            "token":"QUNDT1VOVEtFWTp1c2VyTmFtZTpteXRva2Vu",
            "externalEndpointConfiguration":"myEndpoint",
            "creationTime":"2019-09-05T05:31:01.232Z",
            "lastModifiedTime":"2019-09-05T05:31:01.232Z",
            "id":"<YOUR_FIRST_BRIDGE_ID>"
         },
         {
            "channel":"myChannel",
			"state":"running",
			"status":"Up 38 minutes",
            "token":"QUNDT1VOVEtFWTp1c2VyTmFtZTpteXRva2Vu",
            "externalEndpointConfiguration":"myEndpoint",
            "creationTime":"2019-09-16T15:32:01.242Z",
            "lastModifiedTime":"2019-09-25T10:31:07.272Z",
            "id":"<YOUR_SECOND_BRIDGE_ID>"
         }
      ]
   },
   "metadata":{
      "status":"success"
   }
}
channel Module
As an alternative to managing channels visually from the Workspace (under the Settings | Channels tab), scriptr.io offers the channel module which allows you to programmatically manage your channels from within your scripts. These channels are used by the pubsub and queue modules as topics and queues respectively to exchange messages or invoke scripts.
create
Creates a new channel; throws the "DUPLICATE_CHANNEL" exception if a channel with the same name already exists.
Parameter | Description |
|---|---|
| name | String representing the name that serves as a unique identifier for the channel. |
| acls | JavaScript object containing the different ACLs that can be set on the channel. Optional. |
The acls object properties are as follows:
Property | Description |
|---|---|
| subscribeACL | Controls whether you want anonymous or authenticated requests to subscribe to the channel. It can be set to either "AUTHENTICATED" or "ANONYMOUS", it defaults to "AUTHENTICATED". |
| publishACL | Controls whether you want anonymous or authenticated requests to publish to the channel. It can be set to either "AUTHENTICATED" or "ANONYMOUS", it defaults to "AUTHENTICATED". |
var channels = require("channel");
var options = {
  "subscribeACL": "anonymous",
  "publishACL": "authenticated"
}
return channels.create("myChannel", options);
For free accounts, the maximum allowed number of channels is 20.
delete
Deletes a specified channel by name.
| Parameter | Description |
|---|---|
| name | String representing the name that serves as a unique identifier for the channel. |
Return value: no result is returned. In case of a failure the appropriate error code and details will be returned in the metadata property (refer to common function response).
get
Retrieves a specified channel by name.
| Parameter | Description |
|---|---|
| name | String representing the channel name. |
Return value: JSON object containing the channel. In case of a failure the appropriate error code and details will be returned in the metadata property (refer to common function response).
{
	"result" : {
		"name" : "MyChannel",
		"subscribeACL" : "authenticated",
		"publishACL" : "authenticated",
		"creationTime" : "2015-08-17T18:17:49.530Z",
		"lastModifiedTime" : "2015-08-17T18:17:49.530Z"
	},
	"metadata" : {
		"status" : "success"
	}
}
list
Retrieves the list of all existing channels.
Return value: JSON object containing an array that contains all the existing channels along with their details. In case of a failure the appropriate error code and details will be returned in the metadata property (refer to common function response).
{
	"result" : {
		"count" : "2",
		"channels" : [{
				"name" : "channelX",
				"subscribeACL" : "anonymous",
				"publishACL" : "authenticated",
				"creationTime" : "2015-06-30T07:54:18.416Z",
				"lastModifiedTime" : "2015-06-30T07:55:30.063Z"
			}, {
				"name" : "channelY",
				"subscribeACL" : "anonymous",
				"publishACL" : "authenticated",
				"creationTime" : "2015-06-30T07:54:18.416Z",
				"lastModifiedTime" : "2015-06-30T07:55:30.063Z"
			}
		]
	},
	"metadata" : {
		"status" : "success"
	}
}
update
Updates a channel's ACLs.
Parameter | Description |
|---|---|
| name | String representing the name that serves as a unique identifier for the channel. |
| acls | Optional JavaScript object containing the different ACLs that can be set on the channel. |
The acls object properties are as follows:
Property | Description |
|---|---|
| subscribeACL | Controls whether you want anonymous or authenticated requests to subscribe to the channel. It can be set to either "AUTHENTICATED" or "ANONYMOUS", it defaults to "AUTHENTICATED". |
| publishACL | Controls whether you want anonymous or authenticated requests to publish to the channel. It can be set to either "AUTHENTICATED" or "ANONYMOUS", it defaults to "AUTHENTICATED". |
var channels = require("channel");
var options = {
  "subscribeACL": "anonymous",
  "publishACL": "authenticated"
}

return channels.update("myChannel", options);
device Module
The device module allows you to create and manage devices. Each device is associated to the below schema that provides the basic device fields and ACLs. You can modify the schema to meet your needs by updating the apsdb_device system schema.
<!--
This is the default device schema. Feel free to modify it to your liking.
This schema follows all rules and restrictions as all other schemas, as do, the documents (devices) created out of it.
However, it imposes the following restrictions of its own:
1. The seven default fields (groups, name, id,token, password, locale and isSuspended) are required.
2. This schema cannot be deleted.

Additionally, since this schema is used for device management, the following ACLs are set by default upon creation of each new device document:
- document.readACL = id, creator
- document.writeACL = id, creator
- required.readACL = nobody
- required.writeACL = nobody
- requiredVisibles.readACL = creator
- requiredVisibles.writeACL = nobody
- requiredEditables.readACL = creator
- requiredEditables.writeACL = creator

You can specify your own ACLs upon device creation by passing them as parameters to the save function of the device module as described in the documentation.
-->
<schema>
  <aclGroups>
    <aclGroup name="required">
      <read>nobody</read>
      <write>nobody</write>
      <fields>
        <field>isSuspended</field>
      </fields>
    </aclGroup>
    <aclGroup name="requiredVisibles">
      <read>creator</read>
      <write>nobody</write>
      <fields>
        <field>id</field>
        <field>groups</field>
        <field>token</field>
      </fields>
    </aclGroup>
    <aclGroup name="requiredEditables">
      <read>creator</read>
      <write>creator</write>
      <fields>
        <field>name</field>
        <field>password</field>
        <field>locale</field>
      </fields>
    </aclGroup>
    <defaultAcl>
      <read>creator</read>
      <write>creator</write>
    </defaultAcl>
    <schemaAcl>
      <read>creator</read>
      <write>creator</write>
      <delete>nobody</delete>
    </schemaAcl>
  </aclGroups>
  <fields>
    <field name="id" type="string" />
    <field name="name" type="string"/>
    <field name="groups" type="string" />
    <field name="password" type="string" />
    <field name="locale" type="string" />
    <field name="isSuspended" type="string" />
    <field name="token" type="string" />
  </fields>
</schema>
save
Saves a device with the provided fields. If the device already exists, it gets updated; otherwise, it gets created.
| Parameter | Description |
|---|---|
| device | A JSON object containing the device fields. |
The device object properties are as follows:
| Property | Description |
|---|---|
| id | String representing the unique identifier of the device. Optional upon device creation, if not provided, a random ID will be generated. It accepts alphanumeric characters, at signs (@), underscores (_), periods (.), and dashes (-) can have a maximum length of 243 characters. |
| name | String representing the name of the device. Optional upon update. |
| password | String representing the password of the device. Optional upon update. |
| groups | Represents the group(s) to which this device will be added. It can have any of the following values:
Group name accepts alphanumeric characters (a-z A-Z 0-9), dashes (-) and underscores (_), and can have a maximum length of 128 characters. Note that passing a null or empty value removes the device from all groups. |
| isSuspended | Boolean value specifying whether or not the device is suspended. Optional, defaults to false. When set to true, the device will be treated as if it was deleted from the system. It can be reactivated by updating this value to false. |
| globalDateFormat | String representing the date format to use to parse any date field values passed as string. Optional, if not specified, the formats "yyyy-MM-dd'T'HH:mm:ssZ" (e.g. 2017-01-13T13:01:02+0000) and "yyyy-MM-dd" (e.g. 2017-01-13) only will be accepted. Refer to this document for the accepted date formats. |
| meta.types | JSON object containing the list of the document field names to be created/updated along with their corresponding types. The field types can be:
Note that any fields omitted from the meta.types will default to type string, unless otherwise specified in the corresponding device schema. |
| <fieldName> | Key-value pair representing the name of the field along with its values. Each value can be:
Note that passing a null or empty value deletes the field from the device. A field of type file should always be defined in the schema first. |
// We need to edit the device schema to allow adding a field called reports for saving files
var newSchemaDefinition = '<schema><aclGroups><aclGroup name="required"><read>nobody</read><write>nobody</write><fields><field>isSuspended</field></fields></aclGroup><aclGroup name="requiredVisibles"><read>creator</read><write>nobody</write><fields><field>id</field><field>groups</field><field>token</field></fields></aclGroup><aclGroup name="requiredEditables"><read>creator</read><write>creator</write><fields><field>name</field><field>password</field><field>locale</field><field>reports</field></fields></aclGroup><defaultAcl><read>creator</read><write>creator</write></defaultAcl><schemaAcl><read>creator</read><write>creator</write><delete>nobody</delete></schemaAcl></aclGroups><fields><field name="id" type="string" /><field name="name" type="string" /><field name="groups" type="string" /><field name="password" type="string" /><field name="locale" type="string" /><field name="isSuspended" type="string" /><field name="token" type="string" /><field name="reports" type="file" /></fields></schema>';

var schema = require("schema");
return schema.update("apsdb_device", newSchemaDefinition);
var devices = require("device");

var reportA = request.files["reportA"][0];
var reportB = request.files["reportB"][0];

var lastOnline = new Date();

var params = {
	"id" : "AB825CE1520F",
	"password" : "1a2afef9b19c975b429a92ec22e873c8",
	"name" : "deviceA",
	"level" : 9.8,
	"description" : "IoT door monitoring sensor.",
	"firmwareVersion" : "v1.0.972",
	"lastOnline" : lastOnline,
	"location" : "48.8580,2.2951",
	"reports" : [reportA, reportB],
	"meta.types" : {
		"description" : "text",
		"level" : "numeric",
		"lastOnline" : "date",
		"firmwareVersion" : "string",
		"location" : "geospatial"
	}
};

return devices.save(params);
{
   "result":{
      "device":{
         "id":"AB825CE1520F"
      }
   },
   "metadata":{
      "status":"success"
   }
}
create
Creates a new device; throws the "DUPLICATE_DEVICE" exception if a device with the same ID already exists, or a "DUPLICATE_USER" exception if a user with the same ID already exists. The create function takes the same parameter as the save function.
update
Updates a device; throws the "INVALID_DEVICE" exception if the device does not exist. The update function takes the same parameter as the save function.
delete
Deletes a device based on the specified ID.
| Parameter | Description |
|---|---|
| id | String representing the ID of the device to be deleted. |
Return value: no result is returned. In case of a failure the appropriate error code and details will be returned in the metadata property (refer to common function response).
get
Retrieves a device by ID.
| Parameter | Description |
|---|---|
| id | String representing the identifier of the device to be retrieved. |
| includeFieldType | Boolean which, when set to true, will return the meta.types property that contains the list of the device document's fields along with their corresponding field types. |
Return value: JSON object containing all the fields of the requested device. In case of a failure the appropriate error code and details will be returned in the metadata property (refer to common function response).
query
The query function takes the same parameter "filter" as the user module's query function.
getAttachment
Retrieves an attachment from a specific device.
| Parameter | Description |
|---|---|
| id | String representing the identifier of the device. |
| fileName | String representing the name of the requested file attachment. |
| fieldName | String representing the name of the field under which the requested file is saved. |
Return value: JSON object containing the properties and content of the file attachment. In case of a failure the appropriate error code and details will be returned in a metadata property.
generateToken
Generates a token for the specified device. You can only generate one token per device.
The generated token does not expire, therefore, it is called eternal token.
| Parameter | Description |
|---|---|
| id | String representing the identifier of the device for which the token should be generated. |
Return value: JSON object containing the generated token. In case of a failure the appropriate error code and details will be returned in the metadata property (refer to common function response).
var devices = require("device");

// Generate the eternal token for device "myDevice"
return devices.generateToken("myDevice");
{
    "result": {
        "token": "TjA2QjI2MTc0MTpnZ25EMMMyOjhDNjdENTFFRUVDOTEwBjkxMUE0NEZENDlPRkQ4Q0Iw"
    },
    "metadata": {
        "status": "success"
    }
}
regenerateToken
Regenerates a token for the specified device.
| Parameter | Description |
|---|---|
| id | String representing the identifier of the device for which the token should be regenerated. |
Return value: JSON object containing the newly generated token. In case of a failure the appropriate error code and details will be returned in the metadata property (refer to common function response).
var devices = require("device");

// Regenerate the eternal token for device "myDevice"
return devices.regenerateToken("myDevice");
revokeToken
Deletes the token of the specified device.
| Parameter | Description |
|---|---|
| id | String representing the identifier of the device for which the token should be revoked. |
Return value: no result is returned. In case of a failure the appropriate error code and details will be returned in the metadata property (refer to common function response).
var devices = require("device");

// Revoke the eternal token for device "myDevice"
return devices.revokeToken("myDevice");
document Module
In scriptr.io, data is represented as document entities where each document has a unique key and a collection of fields. Each field consists of a name, multiple values and a type.
As documents are saved in a store in scriptr.io, every instance of the document module is associated with a specific store allowing you to perform actions against that store. When you require the document module inside your script, it will always return the instance associated with the "DefaultStore"; therefore, all calls you make using that instance will be executed on the default store. If you want to manipulate documents on a different store, you can use the getInstance(storeName) method to retrieve an instance of the document module associated with a specific one, and then perform your actions using that instance.
All documents are secured individually with ACLs, allowing developers to specify the Devices and/or Groups that can view, update or delete a document, or more granularly individual fields within that document.
getInstance
Returns an instance of the document module associated with a specific store. All actions performed against this instance, such as saving or deleting documents, will be executed against its associated store.
| Parameter | Description |
|---|---|
| storeName | String representing a store name. |
Return value: object representing the instance of the document module associated with the specified store.
// Get an instance of the DefaultStore using the require() function
var defaultStoreDocuments = require("document");
// Get an instance of your custom store called "myStore"
var myStoreDocuments = defaultStoreDocuments.getInstance("myStore");

// Retrieve the document "myDocument" that is saved in "myStore"
return myStoreDocuments.get("myDocument");
save
Saves a document along with its content. If the document already exists, it gets updated; otherwise, it gets created.
| Parameter | Description |
|---|---|
| document | JSON object containing the fields to be persisted in the document. |
The document object properties are as follows:
| Property | Description |
|---|---|
| key | String representing the unique document identifier. If not provided, it will be generated automatically. Optional upon document creation. |
| <field> | Key-value pair representing the name of the field along with its values. Each value can be:
Note that passing a null or empty value deletes the field from the document. |
| attachments | Array of file objects to be attached to a document. Optional. |
| meta.types | JSON object containing the list of the document field names to be created/updated along with their corresponding types. The field types can be:
Note that any fields omitted from the meta.types will default to type string, unless otherwise specified in the corresponding document schema. |
| meta.schema | Represents the name of a preset schema to apply to the document. Optional. |
| meta.newVersion | Boolean specifying whether this call will create a new version of the document (if set to true) instead of updating the existing one (if set to false). Note that versioning can only be used when the document has a schema. Optional. |
| meta.latestVersion | Numeric that indicates the latest version of the document that the user expects to be modifying to manage concurrent updates. If the document has a different latest version number than the one specified, then the update will fail. Note that it can only be sent when a document is versioned. Optional. |
| meta.ftsFields | Represents the name(s) of the field(s) that will be searchable using full-text queries. It accepts either a string or an array of strings. Optional. |
var documents = require("document");

// Retrieve the country flag image file from the request
var countryFlag = request.files["flag"];

// Define the document content
var fields = {
	// set the document key
	"key": "myCountryDocumentKey",
	// add a field containing a string value called name
	"name": "USA",
	// add a field containing a numeric value called totalLandArea
	"totalLandArea": 9147593,
	// add a field containing a date value called independenceDay
	"independenceDay": "1776-07-04",
  	// add a field representing the ID of the device that gathers data related to this document
  	"deviceId": "31afe00925b6a",
  	// add a field representing the device geo-location
  	"deviceLocation": "48.8580,2.2951",
	// add a field containing an array of string value called states
	"states": [
		"New York",
		"California",
		"Chicago",
		"Utah"
	],
	// add a field containing a text value called history
	"history": "The U.S. is a country of 50 states covering a vast swath of North America, with Alaska in the extreme Northwest and Hawaii extending the nation’s presence into the Pacific Ocean. Major cities include New York, a global finance and culture center, and Washington, DC, the capital, both on the Atlantic Coast; Los Angeles, famed for filmmaking, on the Pacific Coast; and the Midwestern metropolis Chicago.",
	// add the country flag image that got retrieved from the request as an attachment to the document
	"attachments": countryFlag,
  	// enable full text-search on the history field
  	"meta.ftsFields":"history",
	// define the types of the fields added above to match their content types
	"meta.types": {
		"name": "string",
		"totalLandArea": "numeric",
		"independenceDay": "date",
		"states": "string",
      	"deviceId": "string",
      	"deviceLocation": "geospatial",
		"history": "text"
	}
};

// Persist the document myCountryDocumentKey
return documents.save(fields);
var documents = require("document");

// Define the document content to be updated
var fields = {
	// specify the document key
	"key": "myCountryDocumentKey",
	// Update the states field by appending and deleting some values
	"states": {"append":["New Mexico", "Washington"], "delete":["Utah"]},
	// delete the history field by setting it to an empty string
	"history": "",
	// add a new field to the document called connected of type string
	"connected": "true",
    // specify the type of the newly added field
    "meta.types": {
        "connected": "string"
    }
};

return documents.save(fields);
{
    "result":{
        "document":{
            "key":"myCountryDocumentKey",
            "versionNumber":"1.0"
        }
    },
    "metadata":{
        "status":"success"
    }
}
create
Creates a new document; throws the "DUPLICATE_DOCUMENT_KEY" exception if a document with the same key already exists. The create function takes the same parameter as the save function.
update
Updates a document; throws the "DOCUMENT_NOT_FOUND" exception if the document does not exist. The update function takes the same parameter as the save function.
delete
Deletes a document based on the specified key.
| Parameter | Description |
|---|---|
| key | String representing the key of the document to be deleted. |
Return value: no result is returned. In case of a failure the appropriate error code and details will be returned in the metadata property (refer to common function response).
var documents = require("document");

// Delete the document with key "myCountryDocumentKey"
return documents.delete("myCountryDocumentKey");
query
Queries document data from the current store according to the conditions passed in the provided filter.
| Parameter | Description |
|---|---|
| filter | JSON object containing the parameters to be sent along with the query request. |
Return value: JSON object containing the array of documents matching the query filter. In case of a failure the appropriate error code and details will be returned in the metadata property (refer to common function response).
The filter object properties are as follows:
| Property | Description |
|---|---|
| query | String representing the query condition to execute. Optional. |
| ftsQuery | String used to refine the search after executing the query condition by performing a full-text search on the returned documents. Note that when using the ftsQuery parameter, the sort and aggregateExpression parameters will be ignored. |
| count | Boolean specifying whether or not to return the total count of documents found. Optional, defaults to false. Note that if the ftsQuery parameter is sent in the request, the count will be equal to the number of documents returned in the first page instead of the total number of hits. |
| fields | String containing a comma separated list of fields that should be returned by the query. Optional if the count property is passed in the filter. Note that in addition to the user defined fields, you can query on the system fields: creator, lastModifiedDate, lastModifiedBy, creationDate, versionNumber and latest. In order to return all fields, you can pass the * wildcard. The query will always return the document key and the versionNumber in addition to the specified fields. |
| sort | String containing a comma separated list of the fields on which to sort. Optional. The syntax for sorting fields is: "fieldName<fieldType:sortingOrder>". For instance, to sort a document by name and birthday fields, you could pass in the value “name<string:ASC>, birthday<date:DESC>”. Note that this parameter is ignored when using the ftsQuery parameter. |
| resultsPerPage | Numeric value that determines the number of documents per page to return. Optional, defaults to 50. |
| pageNumber | Numeric value representing the number of the page to be returned. Optional, defaults to 1. |
| includeFieldType | Boolean specifying whether or not to return the meta.types property for each document. The meta.types is a JSON object containing the names and types of the fields returned by the query. Optional, defaults to false. |
| aggregateExpression | Contains the aggregate expression to execute. Note that this parameter is ignored when using the ftsQuery parameter. Optional. |
| aggregateGroupBy | Groups the aggregate result by one or more fields. Optional. The syntax for grouping by field is: "fieldName<fieldType>". For instance, to group the results per deviceType and category, you pass in the value “deviceType<String>, category<numeric>”. |
| aggregatePage | Specifies whether or not the aggregate function will be executed on the documents that are displayed on the current page. Optional, defaults to true. |
| aggregateGlobal | Specifies whether or not the aggregate function will be executed on all documents returned by the query on all pages. Optional, defaults to false. |
| saveDocumentACL | Value representing the access control list that restricts saving the document. It defaults to nobody. |
| deleteDocumentACL | Value representing the access control list that restricts deleting the document. It defaults to nobody. |
| getAttachmentACL | Value representing the access control list that restricts retrieval of file attachments from the document. It defaults to nobody. |
| queryACL | Value representing the access control list that restricts access to querying the document. It defaults to nobody. |
var documents = require("document");

var results;
/* Search for the documents where the states field contains "Chicago" and "California",
 * sort by creationDate (ASC) and totalLandArea (DESC),
 * return the states, totalLandArea and creationDate fields.
 */
results = documents.query({"query":'states in ["Chicago", "California"]', "sort":"creationDate<date:ASC>, totalLandArea<numeric:DESC>", "fields":"states, totalLandArea, creationDate"});

// Search for documents having the words "Washington" and "DC" in any of their full-text indexed fields
results = documents.query({"fields":"*", "ftsQuery":"Washington DC"});
{
		"result": {
			"documents": [
				{
					"key": "myCountryDocumentKey",
					"versionNumber": "1.0",
					"states": [
						"New York",
						"Chicago",
						"California",
						"New Mexico",
						"Washington"
					],
					"totalLandArea": "9147593.0",
					"creationDate": "2016-11-15T15:59:29+0000"
				}
			]
		},
		"metadata": {
			"status": "success"
		}
}
var documents = require("document");

var results;
// Get the average temperature of all sensors
results = documents.query({"query":'deviceType = "sensor"', "aggregateExpression":"avg($temperature)", "fields": "temperature"});

// Get the average temperature grouped by device type and category number for the first page and for all pages (global)
results = documents.query({"aggregateExpression":"avg($temperature)", "aggregateGroupBy":"deviceType<String>, category<numeric>", "aggregatePage":true, "aggregateGlobal":true});

// You can similarly use other aggregates such as MIN, MAX, SUM, AVG, or COUNT, in a similar fashion. Another example:
results = documents.query({"aggregateExpression":"max($totalLandArea)", "aggregatePage":true, "aggregateGlobal":true, "fields": "totalLandArea"});

return results;
{
	"result" : {
		"aggregate" : {
			"pageScope" : {
				"value" : "9147593.0"
			},
			"globalScope" : {
				"value" : "9147593.0"
			}
		},
		"documents" : [{
				"key" : "myCountryDocumentKey",
				"versionNumber" : "1.0",
				"totalLandArea" : "9147593.0"
			}, {
				"key" : "anotherCountryDocumentKey",
				"versionNumber" : "1.0",
				"totalLandArea" : "10542.0"
			}
		]
	},
	"metadata" : {
		"status" : "success"
	}
}
var documents = require("document");

// Search for documents which devices are located within 200 meters of the reference point '48.8588, 2.2965' and return the distance between these devices and the reference point.
return documents.query({
	"query" : 'name<string>="USA" and deviceLocation<geospatial> within (48.8588, 2.2965, 0.200)',
	"includeFieldType" : "true",
	"fields" : "key, deviceLocation, distance(deviceLocation,'48.8588', '2.2965')",
	"sort" : "distance(deviceLocation,48.8588,2.2965)<ASC>"
});
To query on geospatial fields, the "within" operator should be used. It allows queries to search for geospatial locations that lie within a specified distance from a reference point. Consequently, this operator requires 2 parameters: a geospatial reference point (represented as a pair of latitude/longitude decimal degrees), and a distance value (in kilometers). As an example, the following query condition can be used to find all locations that are 200m away from the Eiffel Tower: location<geospatial> within (48.8580, 2.2951, 0.200).
When returning fields, the distance formula can be expressed in several ways:
- It can be passed a pair of geospatial points, each represented as a latitude and longitude pair. (Example: distance ('1.0', '2.0', '3.0', '4.0') returns the distance between the geopatial coordinates (1.0, 2.0) and (3.0, 4.0)).
- It can be passed a pair of geospatial fields. (Example: distance (gpsLocation1, gpsLocation2)).
- It can be passed a geospatial field and a geospatial point. (Example: distance(gpsLocation, '1.0', '2.0')).
In all cases, the value returned will be the distance in kilometers between the two geospatial locations.
{
	"result" : {
		"documents" : [{
				"key" : "myCountryDocumentKey",
				"versionNumber" : "1.0",
				"deviceLocation" : "48.858,2.2951",
				"_derivedFields" : {
					"distance(deviceLocation,'48.8588', '2.2965')" : "0.1357"
				},
				"meta.types" : {
					"deviceLocation" : "geospatial"
				}
			}
		]
	},
	"metadata" : {
		"status" : "success"
	}
}
get
Retrieves a document by key.
| Parameter | Description |
|---|---|
| key | String representing the key of the document to be retrieved. |
| versionNumber | Numeric representing the version number of the document. Optional, defaults to 1. |
Return value: JSON object containing all the fields of the requested document. In case of a failure the appropriate error code and details will be returned in the metadata property (refer to common function response).
var documents = require("document");

// Return the second version of document with key "myCountryDocumentKey"
return documents.get("myCountryDocumentKey", 2);
{
    "result":{
        "key":"myCountryDocumentKey",
        "versionNumber":"2.0",
        "independenceDay":"1776-07-04T00:00:00+0000",
        "attachments":"flag.gif",
        "history":"The U.S. is a country of 50 states covering a vast swath of North America, with Alaska in the extreme Northwest and Hawaii extending the nation’s presence into the Pacific Ocean. Major cities include New York, a global finance and culture center, and Washington, DC, the capital, both on the Atlantic Coast; Los Angeles, famed for filmmaking, on the Pacific Coast; and the Midwestern metropolis Chicago.",
        "states":[
            "New York",
            "Chicago",
            "California",
            "Utah"
        ],
        "name":"USA",
        "totalLandArea":"9147593.0",
        "creator":"scriptr",
        "lastModifiedDate":"2016-08-12T14:29:29+0000",
        "lastModifiedBy":"scriptr",
        "creationDate":"2016-08-12T14:29:29+0000",
        "latest":"1.0",
        "meta.types":{
            "independenceDay":"date",
            "attachments":"file",
            "history":"text",
            "states":"string",
            "name":"string",
            "totalLandArea":"numeric",
            "creator":"string",
            "lastModifiedDate":"date",
            "lastModifiedBy":"string",
            "creationDate":"date",
            "versionNumber":"numeric",
            "key":"string",
            "latest":"numeric"
        }
    },
    "metadata":{
        "status":"success"
    }
}
getAttachment
Retrieves an attachment from a specific document.
| Parameter | Description |
|---|---|
| key | String representing the key of the document. |
| fileName | String representing the name of the requested file attachment. |
| options | JSON object containing additional options. Optional. |
Return value: JSON object containing the properties and content of the file attachment. In case of a failure the appropriate error code and details will be returned in a metadata property.
The options object properties are as follows:
| Property | Description |
|---|---|
| fieldName | String representing the name of the document field that contains the attachment. Optional, defaults to "attachments". |
| versionNumber | Numeric representing the version number of the document from which to retrieve the attachment. Optional, defaults to 1. |
var documents = require("document");

var getDocument = documents.get("myCountryDocumentKey");

if(getDocument.metadata.status == "success"){
	// Get the name of the file to be retrieved
	var filename = getDocument.result.attachments;

    // Retrieve the attachment
	var result = documents.getAttachment("myCountryDocumentKey", filename, {"fieldName": "attachments", "versionNumber": "1"});

	// As a best practice, always check the status of the previous call
	if (result.metadata && result.metadata.status == "failure") {
		return result.metadata.errorDetail;
	} else { // write the file to the response

		// you can also choose to trigger the browser's save as/download feature by uncommenting the following line:
		//response.setHeader("content-disposition", "attachment;filename=" + filename);

		response.setHeader("content-type","image/png");
		response.setStatus(200);

		// Add the CORS headers
		response.addHeaders(configuration.crossDomainHeaders);

		response.write(result);
	}
}
facebook Module
Scriptr.io provides the facebook module that allows you to interact with Facebook. This module's APIs will use by default the configuration that you have saved in your Settings. However, if you need to use the credentials of a different Facebook app, you can pass them as a parameter to any of the APIs as described below.
| Parameter | Description |
|---|---|
| credentials | Optional parameter of type object, holding the Facebook app's credentials to be used instead of the ones saved in the Settings. It can contain the following set of key/value pairs:
* not applicable for getAuthorizationUrl and getAccessToken. |
callApi
Calls any node and edge in the Facebook Graph API and returns the result in a JSON string.
| Parameter | Description |
|---|---|
| resourceUrl | String representing the URL identifying the API to call. |
| verb | String representing one of the following method: GET, POST or PUT. |
| parameters | Object holding a set of key/value pairs containing API specific parameters. |
Return value: JSON object containing the response from the Facebook API call in JSON format. In case of a failure the appropriate error code and details will be returned in the metadata property (refer to common function response).
getApiCall
Calls any node and edge in the Facebook Graph API and returns a URL that will retrieve the result when called.
| Parameter | Description |
|---|---|
| resourceUrl | String representing the URL identifying the API to call. |
| verb | String representing one of the following method: GET, POST or PUT. |
| parameters | Object holding a set of key/value pairs containing API specific parameters. |
Return value: JSON object containing the url/formEncodedParams that needs to be called to get the network's response for the requested API. In case of a failure the appropriate error code and details will be returned in the metadata property (refer to common function response).
getAuthorizationUrl
Requests a link to the login screen URL from Facebook. The login screen will ask the user to authorize the app to perform certain actions as specified in the scope parameter.
| Parameter | Description |
|---|---|
| callbackUrl | String representing the URL that Facebook will redirect to after the user authorizes the application. Note: Facebook requires that the URL ends with a “/”. |
| scope | String representing the scope that the user is requesting the token for. The scope defines the set of permissions the application will have. |
| state | String identifying the current user/request. |
Return value: JSON object containing the authorization URL. In case of a failure the appropriate error code and details will be returned in the metadata property (refer to common function response).
getAccessToken
Retrieves the user access token from Facebook that will be sent with all future requests for authentication.
| Parameter | Description |
|---|---|
| callbackUrl | String representing the callbackUrl specified when calling getAuthorizationUrl. Note: Facebook requires this parameter, and it should be the same as the one set when calling getAuthorizationUrl . |
| oauthVerifier | String representing the verifier parameter returned by Facebook in response to an authorization. This verifier will be sent as a parameter when calling the callbackUrl specified when calling getAuthorizationUrl. |
Return value: JSON object containing the access token. In case of a failure the appropriate error code and details will be returned in the metadata property (refer to common function response).
group Module
Scriptr.io allows you to manage the access permissions by organizing users and devices by groups and assigning ACLs to these groups. The users and devices under a specific group will automatically be assigned the ACLs of that group.
create
Creates a new group.
| Parameter | Description |
|---|---|
| name | String representing the name of the group to be created. |
Return value: no result is returned. In case of a failure the appropriate error code and details will be returned in the metadata property (refer to common function response).
rename
Renames an existing group.
| Parameter | Description |
|---|---|
| name | String representing the name of the group to be renamed. |
| newName | String representing the new name of the group. |
Return value: no result is returned. In case of a failure the appropriate error code and details will be returned in the metadata property (refer to common function response).
delete
Deletes an existing group. The devices or users belonging to that group will lose the permissions that were assigned to that group.
| Parameter | Description |
|---|---|
| name | String representing the name of the group to be deleted. |
Return value: no result is returned. In case of a failure the appropriate error code and details will be returned in the metadata property (refer to common function response).
list
Retrieves the list of all existing groups.
Return value: JSON object containing the array of the group names. In case of a failure the appropriate error code and details will be returned in the metadata property (refer to common function response).
http Module
Scriptr.io provides the http module that allows you to easily issue any HTTP request from within a script. All you need to do is to require it and invoke its request(options) function.
request
Issues an HTTP request.
| Parameter | Description |
|---|---|
| options | JSON object containing the properties of the HTTP request to invoke. |
Return value: JSON object containing the HTTP request status, header, body and timeout.
The options object properties are as follows:
| Property | Description |
|---|---|
| url | String representing the base URI for the HTTP request. Mandatory. |
| method | String representing the HTTP method to use when issuing the call to the remote service. The supported methods are POST, GET, PUT, DELETE, PATCH, HEAD and OPTIONS. Defaults to GET. Optional. |
| params | JSON object representing the map of HTTP parameters to be sent to the remote service along with the request. Optional. |
| authCreds | Array containing the username and password in case the request requires HTTP Authentication (e.g., "authCreds": ["username","password"]). Optional. |
| headers | JSON object representing the map of HTTP headers to be sent to the remote service along with the request. Optional. |
| files | JSON object representing the map of files to be sent to the remote service along with the request. Optional. Note: If you are trying to send a single file in the HTTP request, you can use one of the following approaches:
|
| returnFileRef | Boolean value indicating whether or not to return the HTTP response in the value returned from the remote service call. Optional. Defaults to false. |
| bodyString | String value representing the body to be passed to the HTTP request. Optional. |
| disableParameterEncoding | Boolean value indicating whether or not the request parameters are encoded before being sent in the request. If true, then parameters are not encoded. Optional. Defaults to false. |
| encodeHeaders | Boolean value indicating whether request headers are encoded before being sent in the request. If true, then headers are encoded. Optional. Defaults to false. |
// require the "http" module
var http = require("http");
// build a request. You should at least provide the "url" field
var requestObject = {
	"url" : "http://api.openweathermap.org/data/2.5/weather",
	"params" : {
		"q" : "london,uk"
	},
	"method" : "GET" // optional if GET
}
// send the request by invoking the request function
// of the http module and store the returned response object
var response = http.request(requestObject);
// get the body of the response as a string
var responseBodyStr = response.body;
// check the status of the response
if (response.status == "200") {
	// manipulate the response headers
	if (response.headers["Content-Type"].indexOf("application/json") > -1) {
		return JSON.parse(responseBodyStr);
	}
	return responseBodyStr;
} else {
	return "Remote API returned an error " + response.status;
}
{
"result": {
	"status": "200",
	"headers": {
		"X-Source": "the x-source",
		"Access-Control-Allow-Origin": "the CORS configuration, if any",
		"Transfer-Encoding": "type of transfer encoding",
		"Date": "the response date",
		"Access-Control-Allow-Methods": "allowed HTTP methods",
		"Access-Control-Allow-Credentials": "true/false",
		"Connection": "keep-alive",
		"Content-Type": "the HTTP response content type and allowed charset",
		"Server": "the HTTP server"
	},
	"body": "the response body, as a string. Note that this could be a stringified JSON or could contain an error message sent by the remote service."
	"timeout": true/false
}
{
	"metadata": {
		"status": "failure",
		"errorCode": "HTTP error code",
		"errorDetail": "HTTP error details"
	}
}
log Module
To facilitate debugging remote calls from hardware, scriptr.io provides an automatic log of all requests, showing how the request got received (parameters, headers, etc.) and the returned response.
In addition, you can generate custom logs which will appear under logs, grouped by request and only logged based on a user-specified log level. Furthermore, this log view page provides the ability to download the logs, filter them by script name and scheduled scripts.
var log = require("log");
log.setLevel("DEBUG"); //levels are ERROR | WARN | INFO | DEBUG | OFF
log.error("This is the error message of the script");
log.warn("This is the warning message of the script");
log.info("This is the info message of the script");
log.debug("This is the debug message of the script");
- The default level being OFF, remember to always configure your log level as needed. e.g. log.setLevel("DEBUG");
- Scriptr.io retains up to two weeks or 2,560 log entries.
mobile-push Module
The mobile-push module offers a mechanism for users to manage their mobile devices' tokens by organizing them into groups.
getGroup
Retrieves a specified mobile push notifications group by ID.
Parameter | Description |
|---|---|
id | A unique identifier for the group to retrieve. |
Return value: JSON object containing the group properties. In case of a failure the appropriate error code and details will be returned in the metadata property (refer to common function response).
{
	"result" : {
		"group" : {
			"id" : "xxxxx",
			"platform" : "iOS",
			"configurationId" : "xxxxxxx",
			"pushTokens" : [
				"003DAB991FF6C1EFA5854B504D1B7AFAB8F11187BD37B9EA2D82152884B97B91",
				"933C14E952BD20F68AC2F213BDA266CC5F56F10CA795F8139D5AA3965B9AD717"
			],
			"invalidPushTokens" : [
			]
		}
	},
	"metadata" : {
		"status" : "success"
	}
}
listGroups
Retrieves the list of all existing groups. This operation takes no parameters.
Return value: JSON object containing an array that contains all the existing groups along with their details. In case of a failure the appropriate error code and details will be returned in the metadata property (refer to common function response).
{
	"result" : {
		"count" : "2",
		"groups" : [{
				"id" : "xxxxx",
				"platform" : "iOS",
				"configurationId" : "xxxxxxx",
				"pushTokens" : [
					"003DAB991FF6C1EFA5854B504D1B7AFAB8F11187BD37B9EA2D82152884B97B91",
					"933C14E952BD20F68AC2F213BDA266CC5F56F10CA795F8139D5AA3965B9AD717"
				],
				"invalidPushTokens" : [
				],
				"creationTime" : "2015-06-30T07:54:18.416Z",
				"lastModifiedTime" : "2015-06-30T07:55:30.063Z"
			}, {
				"id" : "yyyyy",
				"platform" : "iOS",
				"configurationId" : "xxxxxxx",
				"pushTokens" : [
					"003DAB991FF6C1EFA5854B504D1B7AFAB8F11187BD37B9EA2D82152884B97A91",
					"933C14E952BD20F68AC2F213BDA266CC5F56F10CA795F8139D5AA3965B9AC717"
				],
				"invalidPushTokens" : [
				],
				"creationTime" : "2015-06-30T07:54:18.416Z",
				"lastModifiedTime" : "2015-06-30T07:55:30.063Z"
			}
		]
	},
	"metadata" : {
		"status" : "success"
	}
}
deleteGroup
Deletes a specified mobile push notifications group by ID.
| Parameter | Description |
|---|---|
| id | The unique identifier of the group to be deleted. |
Return value: no result is returned. In case of a failure the appropriate error code and details will be returned in the metadata property (refer to common function response).
addToGroup
Adds push tokens to a group.
| Parameter | Description |
|---|---|
| id | The unique identifier of the group. |
| pushTokens | An array containing the push notification tokens to be persisted in the created group. This group will later be used to send notifications to all the push notification tokens that it contains. * Please note that the maximum number of push tokens allowed is 500. |
Return value: no result is returned. In case of a failure the appropriate error code and details will be returned in the metadata property (refer to common function response).
push
The push function empowers your scripts to push notifications to iOS and Android devices.
| Parameter | Description |
|---|---|
| devices | Array of device tokens to which you want to send the notification to. |
| message | String representing the payload containing the notification message to be sent. For iOS payload details, please refer to the The Notification Payload tutorial. For Android, the payload needs to be sent in the following format '{\"key1\":\"value1\",\"key2\":\"value2\", ...}'. |
| platform | The targeted platform, i.e. the platform of the devices (iOS or Android). |
| isProduction | Boolean value indicating if the push notification should be sent to your production or development application. This parameter is ignored if the notification is meant to be sent to some Android devices and will only be taken into consideration for iOS devices. |
Return value: no result is returned. In case of a failure the appropriate error code and details will be returned in the metadata property (refer to common function response).
var mobpush = require("mobile-push");

var message = '{"aps": { "alert" : "The notification you want to send", "badge" : 5, "sound" : "default"}}';
var arrayDevices = ["45866802973125d73b144b6c5d9c17b24fb4b09cf4d7bff855e2dd8e852a49c6","4565656d3423e455b45355c34243f3553f3255b235352c55454dd3255e324b24"];
var deviceType = "ios";

//this is a push to iOS using the development certificate.
var isProduction = "false";
return mobpush.push(arrayDevices, message, deviceType, isProduction);

//this is a push to iOS using the production certificate.
isProduction = "true";
return mobpush.push(arrayDevices, message, deviceType, isProduction);
var mobpush = require("mobile-push");

var message = "The notification you want to send";
var arrayDevices = ["APA91bHBCTUA8vITavb-yaB2xZlB93xQB1WcquAyzYBjSAJpiEWslvjl-er-1kdvO2VVu52CpgI-ATcMrMs7rKnjInKO2di7pR9njJLJQxd4AK4vpZvGgkxQB2G5fVurKJgiwFKi7Zyyatd0lVy_8GnhieEHUMUbhagURgSTJ7l-dBES00H2eVI"];
var deviceType = "android";
return mobpush.push(arrayDevices, message, deviceType, false);
pushToGroup
The pushToGroup function allows you to push notifications directly from within a script to iOS and Android devices.
| Parameter | Description |
|---|---|
| groupId | String representing the identifier for sending push notifications to a particular mobile application. |
| message | String or JSON representing the message you want to send to the devices through your application. |
Return value: no result is returned. In case of a failure the appropriate error code and details will be returned in the metadata property (refer to common function response).
For information about how to create a group of mobile device tokens, see section Groups Sub-tab.
removeFromGroup
Removes push tokens from a group.
| Parameter | Description |
|---|---|
| id | The unique identifier of the group. |
| pushTokens | An array containing the push notification tokens to be persisted in the created group. This group will later be used to send notifications to all the push notification tokens found in it. |
Return value: no result is returned. In case of a failure the appropriate error code and details will be returned in the metadata property (refer to common function response).
mqtt Module
The mqtt module allows users to create an instance of an MQTT client from either:
- A previously saved external endpoint configuration that can be called by name, or
- Connection parameters for a new MQTT endpoint.
This instance offers users the ability to publish messages to a topic.
getInstance
Returns an instance of the mqtt module connected to the broker configured in the specified endpoint. All actions performed against this instance, such as publishing messages or closing the connection, will be executed against its associated broker.
| Parameter | Description |
|---|---|
| endpointName | The name of the external endpoint configuration to be used. |
Return value: object representing the instance of the mqtt module associated with the specified MQTT broker against which the publish and close APIs can be executed. In case of a failure the appropriate error code and details will be returned in the metadata property (refer to common function response).
getInstance
Returns an instance of the mqtt module connected to the broker specified in the parameters. All actions performed against this instance, such as publishing messages or closing the connection, will be executed against its associated broker.
| Parameter | Description |
|---|---|
| broker | The MQTT broker's address containing the protocol, URL and port number in the form of "<protocol>://<url>:<port>". The value of <protocol> should be either mqtt or mqtts. |
| options | JSON map containing optional parameters. |
Return value: object representing the instance of the mqtt module associated with the specified MQTT broker against which the publish and close APIs can be executed. In case of a failure the appropriate error code and details will be returned in the metadata property (refer to common function response).
The options object properties are as follows:
| Property | Description |
|---|---|
| qos | Numeric between 0 and 2 representing the quality of service. Optional, defaults to 0. |
| clientId | String representing the MQTT client ID. Optional; if not provided, a value is automatically generated by scriptr.io. |
| username | The username used to authenticate against the MQTT endpoint. |
| password | The password used to authenticate against the MQTT endpoint. |
| rootCa | File containing the root certificate authority. |
| key | File containing the private key for SSL. |
| certificate | File containing the certificate for SSL. |
//This is an example using rootCa, key and certificate
var options =
{
	"rootCa":request.files.rootCa[0],
	"certificate": request.files.certificate[0],
	"key": request.files.key[0],
	"password":"pass123",
	"qos":"1",
	"clientId":"someString"
};
mqtt.getInstance("<protocol>://<broker-url>:<port>", options);

//This is an example using username and password
mqtt.getInstance("<protocol>://<broker-url>:<port>", {"username": "<username-value>", "password": "<password-value>"});
publish
Publishes a message to a topic on the MQTT broker associated to the instance.This method can only be used against an instance of the mqtt module obtained using the getInstance() method.
| Parameter | Description |
|---|---|
| topic | String representing the MQTT topic to publish the message to. |
| message | String representing the message to publish. |
Return value: no value is returned. In case of a failure the appropriate error code and details will be returned in the metadata property (refer to common function response).
var mqtt = require("mqtt");

var options = {};
var myMqtt = mqtt.getInstance("<protocol>://<broker-url>:<port>", options);
myMqtt.publish("topic", "Some Message");
myMqtt.close();
close
Closes the MQTT connection to the broker. This method can only be used against an instance of the mqtt module obtained using the getInstance() method. Note that the MQTT connection gets closed automatically at the end of the script execution, however, you can choose to close it at any time by calling this method.
Return value: no value is returned. In case of a failure the appropriate error code and details will be returned in the metadata property (refer to common function response).
pubsub Module
Through its publish-subscribe model, scriptr.io provides the two-way communication that allows devices, scripts and other "things" to relay messages among each other. The pubsub module uses channels as an abstract representation of topics over which messages are exchanged. Therefore, in this section, the terms channel and topic are used interchangeably.
getInstance
Returns an instance of the pubsub module associated with the specified channel. All actions performed against this instance will be executed against its associated channel/topic.
| Parameter | Description |
|---|---|
| channelName | String representing the channel name. |
Return value: object representing the instance of the pubsub module associated with a specific topic.
getStatistics
Retrieves statistics about a topic. This method can only be used against an instance of the pubsub module in order to be executed against the topic that this instance is bound to. If the Message Broadcasting and Queuing feature is not enabled on the account, it returns the error-code "QUEUING_DISABLED".
Return value: JSON object containing the topic statistics. In case of a failure the appropriate error code and details will be returned in the metadata property (refer to common function response).
var pubsub = require("pubsub");
var topic = pubsub.getInstance("myChannel");
return topic.getStatistics();
{
	"metadata": {
		"requestId": "d9b8e304-xxxx-xxxx-xxxx-xxxxxxxxxxxx",
		"status": "success",
		"statusCode": "200"
	},
	"result": {
		"metadata": {
			"status": "failure",
			"statusCode": 400,
			"errorCode": "QUEUING_DISABLED",
			"errorDetail": "Upgrade to a premium plan to get access to the queuing feature by contacting support."
		}
	}
}
{
	"metadata": {
		"requestId": "d04b9842-xxxx-xxxx-xxxx-xxxxxxxxxxxx",
		"status": "success",
		"statusCode": "200"
	},
	"result": {
		"metadata": {
			"status": "success"
		},
		"result": {
			"head_message_timestamp": 1511431786,
			"size":{
				"total":134,
				"unacknowledged":3,
				"ready":131
			},
			"rates":{
				"total":5,
				"unacknowledged":0,
				"ready":5
			},
			"stats":{
				"deliverGet":{
					"count":4709,
					"rate":15.8
				},
				"ack":{
					"count":4706,
					"rate":15.8
				},
				"redeliver":{
					"count":0,
					"rate":0
				},
				"deliverNoAck":{
					"count":0,
					"rate":0
				},
				"deliver":{
					"count":4709,
					"rate":15.8
				},
				"getNoAck":{
					"count":0,
					"rate":0
				},
				"get":{
					"count":0,
					"rate":0
				},
				"publish":{
					"count":4866,
					"rate":19.8
				}
			},
			"subscriberCount":2,
			"subscribers":[
				{
					"peerHost": "x.x.x.x",
					"deviceId": "scriptr",
					"peerPort": "53944"
				},
	            {
					"peerHost": "y.y.y.y",
					"deviceId": "scriptr",
					"peerPort": "9212"
				}
			]
		}
	}
}
publish
Publishes a message to a topic. This method can only be used against an instance of the pubsub module in order to be executed against the topic that this instance is bound to.
Parameter | Description |
|---|---|
| message | JSON objects representing the message to be distributed to subscribers. |
| useEnvelope | String representing a boolean value determining whether or not to wrap the message in a JSON object containing "from" and "message" attributes. The wrapped message is only delivered to WebSocket subscribers ({"from":"scriptr", "message":"test-message"}). Subscribed scripts will still only receive the value of "message" in request.rawBody. Optional, default to false. |
Return value: no result is returned. In case of a failure the appropriate error code and details will be returned in the metadata property (refer to common function response).
var pubsub = require("pubsub");
var topic = pubsub.getInstance("myChannel");
return topic.publish("This is a message", false);
subscribe
Subscribes a script to a topic in order for it to read all the messages published to that topic. When a message is published to a topic, the subscribed script will get executed and will be able to access the message from the request.rawBody property. This method can only be used against an instance of the pubsub module in order to be executed against the topic that this instance is bound to.
You cannot subscribe a device to a topic using this API. You can do so using a WebSocket connection though (refer to the Real-time Communication section).
Parameter | Description |
|---|---|
| scriptName | String representing the script name to be executed. |
Return value: no result is returned. In case of a failure the appropriate error code and details will be returned in the metadata property (refer to common function response).
var pubsub = require("pubsub");
var topic = pubsub.getInstance("myChannel");
return topic.subscribe("myFolder/myScript", "script");
unsubscribe
Unsubscribes a script from a topic in order to stop receiving future messages. This method can only be used against an instance of the pubsub module in order to be executed against the topic that this instance is bound to.
Parameter | Description |
|---|---|
| scriptName | String representing the script name. |
Return value: no result is returned. In case of a failure the appropriate error code and details will be returned in the metadata property (refer to common function response).
var pubsub = require("pubsub");
var topic = pubsub.getInstance("myChannel");
return topic.unsubscribe("myFolder/myScript", "script");
queue Module
The queue module allows you to use scriptr.io's queuing system to queue scripts to be executed in a sequential manner, monitor and control your queues. The queue module uses channels as an abstract representation of queues. Therefore, in this section, the terms channel and queue are used interchangeably.
The Message Broadcasting and Queuing feature is a premium add-on that is disabled by default on the free-mium tier.
getInstance
Retrieves an instance of the queue module associated with the specified channel. All actions performed against this instance will be executed against its associated channel/queue.
| Parameter | Description |
|---|---|
| channelName | String representing the channel name. |
Return value: object containing a queue instance associated with a specific queue. In case of a failure the appropriate error code and details will be returned in the metadata property (refer to common function response).
clear
Clears all items in the queue. This method can only be used against an instance of the queue module in order to be executed against the queue that this instance is bound to. If Message Broadcasting and Queuing feature is not enabled on the account, the error "QUEUING_DISABLED" is returned.
Return value: JSON object containing the status of the operation, success or failure, in a metadata section. In case of a failure the appropriate error code and details will be returned in the metadata property (refer to common function response).
var queue = require("queue").getInstance("myChannel");
return queue.clear();
{
	"metadata": {
		"requestId": "d9b8e304-xxxx-xxxx-xxxx-xxxxxxxxxxxx",
		"status": "success",
		"statusCode": "200"
	},
	"result": {
		"metadata": {
			"status": "failure",
			"statusCode": 400,
			"errorCode": "QUEUING_DISABLED",
			"errorDetail": "Upgrade to a premium plan to get access to the queuing feature by contacting support."
		}
	}
}
getStatistics
Retrieves statistics about the bound queue. This method can only be used against an instance of the queue module in order to be executed against the queue that this instance is bound to. If Message Broadcasting and Queuing feature is not enabled on the account, the error "QUEUING_DISABLED" is returned.
Return value: JSON object containing the queue statistics. In case of a failure the appropriate error code and details will be returned in the metadata property (refer to common function response).
var pubsub = require("pubsub");
var queue = pubsub.getInstance("testQueue");
return queue.getStatistics();
{
	"metadata": {
		"requestId": "d9b8e304-xxxx-xxxx-xxxx-xxxxxxxxxxxx",
		"status": "success",
		"statusCode": "200"
	},
	"result": {
		"metadata": {
			"status": "failure",
			"statusCode": 400,
			"errorCode": "QUEUING_DISABLED",
			"errorDetail": "Upgrade to a premium plan to get access to the queuing feature by contacting support."
		}
	}
}
{
	"metadata": {
		"requestId": "d04b9842-xxxx-xxxx-xxxx-xxxxxxxxxxxx",
		"status": "success",
		"statusCode": "200"
	},
	"result": {
		"metadata": {
			"status": "success"
		},
		"result": {
			"head_message_timestamp": 1511431786,
			"size":{
				"total":134,
				"unacknowledged":3,
				"ready":131
			},
			"rates":{
				"total":5,
				"unacknowledged":0,
				"ready":5
			},
			"stats":{
				"deliverGet":{
					"count":4709,
					"rate":15.8
				},
				"ack":{
					"count":4706,
					"rate":15.8
				},
				"redeliver":{
					"count":0,
					"rate":0
				},
				"deliverNoAck":{
					"count":0,
					"rate":0
				},
				"deliver":{
					"count":4709,
					"rate":15.8
				},
				"getNoAck":{
					"count":0,
					"rate":0
				},
				"get":{
					"count":0,
					"rate":0
				},
				"publish":{
					"count":4866,
					"rate":19.8
				}
			}
		}
	}
}
peek
Peeks through the queue by returning the specified number of elements from the head of the queue, without removing them. This method can only be used against an instance of the queue module in order to be executed against the queue that this instance is bound to. If Message Broadcasting and Queuing feature is not enabled on the account, the error "QUEUING_DISABLED" is returned.
| Parameter | Description |
|---|---|
| itemCount | Numeric representing the number of items to be returned from the queue, starting from the head of the queue. If greater than the queue size, it returns all the messages in the queue. Optional, defaults to 1. |
| payloadMaxCharacters | Numeric representing the number of characters of each item's payload to be displayed in the response. Optional, defaults to 50,000. |
Return value: JSON object containing queue elements. In case of a failure the appropriate error code and details will be returned in the metadata property (refer to common function response).
var pubsub = require("pubsub");
var queue = pubsub.getInstance("testChannel");
return queue.peek({"itemCount": 3});
{
	"metadata": {
		"requestId": "d9b8e304-xxxx-xxxx-xxxx-xxxxxxxxxxxx",
		"status": "success",
		"statusCode": "200"
	},
	"result": {
		"metadata": {
			"status": "failure",
			"statusCode": 400,
			"errorCode": "QUEUING_DISABLED",
			"errorDetail": "Upgrade to a premium plan to get access to the queuing feature by contacting support."
		}
	}
}
{
	"metadata": {
		"requestId": "96e1ce8d-xxxx-xxxx-xxxx-xxxxxxxxxxxx",
		"status": "success",
		"statusCode": "200"
	},
	"result": {
		"metadata": {
			"status": "success"
		},
		"result": [
			{
				"payload_bytes": 34,
				"redelivered": false,
				"routing_key": "SjM2PRJCMDREMQ==.testChannel.invoke",
				"message_count": 10846,
				"properties": {
					"user_id": "SjM2PRJCMDREMTpzY3JpcHRyQG5hc3J5",
					"timestamp": 1511532551,
					"correlation_id": "b0bbb781-xxxx-xxxx-xxxx-xxxxxxxxxxxx"
				},
				"payload": "{'method':'scriptName','params':{}}",
				"payload_encoding": "string"
			},
			{
				"payload_bytes": 34,
				"redelivered": false,
				"routing_key": "SjM2PRJCMDREMQ==.testChannel.invoke",
				"message_count": 10845,
				"properties": {
					"user_id": "SjM2PRJCMDREMTpzY3JpcHRyQG5hc3J5",
					"timestamp": 1511532551,
					"correlation_id": "b0bbb781-xxxx-xxxx-xxxx-xxxxxxxxxxxx"
				},
				"payload": "{'method':'myScript','params':{}}",
				"payload_encoding": "string"
			},
			{
				"payload_bytes": 34,
				"redelivered": false,
				"routing_key": "SjM2PRJCMDREMQ==.testChannel.invoke",
				"message_count": 10844,
				"properties": {
					"user_id": "SjM2PRJCMDREMTpzY3JpcHRyQG5hc3J5",
					"timestamp": 1511532551,
					"correlation_id": "b0bbb781-xxxx-xxxx-xxxx-xxxxxxxxxxxx"
				},
				"payload": "{'method':'testScript','params':{}}",
				"payload_encoding": "string"
			}
		]
	}
}
queue
Adds the specified script to the head of the queue, optionally passing the specified parameters to be available for the script during execution. This method can only be used against an instance of the queue module in order to be executed against the queue that this instance is bound to. If Message Broadcasting and Queuing feature is not enabled on the account, the error "QUEUING_DISABLED" is returned.
| Parameter | Description |
|---|---|
| scriptName | String representing the name of the script to be queued for execution. Required. |
| params | JSON object containing the parameters to be passed to the script during execution. |
Return value: JSON object containing the status of the operation, success or failure, in a metadata section. In case of a failure the appropriate error code and details will be returned in the metadata property (refer to common function response).
var pubsub = require("pubsub");
var queue = pubsub.getInstance("testQueue");
return queue.queue("testScript");
{
	"metadata": {
		"requestId": "d9b8e304-xxxx-xxxx-xxxx-xxxxxxxxxxxx",
		"status": "success",
		"statusCode": "200"
	},
	"result": {
		"metadata": {
			"status": "failure",
			"statusCode": 400,
			"errorCode": "QUEUING_DISABLED",
			"errorDetail": "Upgrade to a premium plan to get access to the queuing feature by contacting support."
		}
	}
}
schema Module
Schemas are used when saving a document to define the kind of data you expect to store for a certain business entity, along with the validation and security rules. For example, you might want to have a vehicle entity in your fleet management application. You can define a schema for that entity, specifying that vehicleId, carType, registrationCertificate, lastServiceDate, fuelPercentage and currentLocation represent the data to be collected for each vehicle. For each of these vehicle attributes, you can associate validation and security rules. Hence, a schema provides a uniform way of dealing with your vehicles. Note that vehicle attributes that are not defined in the schema can still be persisted as part of the vehicle document; however, no specific validation nor security rules can be applied to them.
Scriptr.io does not enforce the use of schemas. Alternatively, you can always persist data without specifying a schema, however, no field-level security nor validation rules can be applied. This "schema-less" mode is meant for prototyping and experimenting purposes. We recommend that business applications be built in a "schema-full" mode.
Please refer to Document Schema Definitions to view the schema syntax (XSD) that you should use to create your schemas. An example of a schema is as follows:
<schema versioning="enabled">
	<aclGroups>
		<aclGroup name="admin">
			<read>userA;group:admin</read>
			<write>group:admin</write>
			<fields>
				<field>vehicleId</field>
				<field>carType</field>
				<field>registrationCertificate</field>
				<field>lastServiceDate</field>
			</fields>
		</aclGroup>
		<aclGroup name="devices">
			<read>authenticated</read>
			<write>authenticated</write>
			<fields>
				<field>fuelPercentage</field>
				<field>currentLocation</field>
			</fields>
		</aclGroup>
		<defaultAcl>
			<read>authenticated</read>
			<write>authenticated</write>
			<delete>group:admin</delete>
		</defaultAcl>
		<schemaAcl>
			<read>nobody</read>
			<write>nobody</write>
			<delete>nobody</delete>
		</schemaAcl>
	</aclGroups>
	<fields>
		<field searchable="false" name="vehicleId" type="numeric" >
			<validation>
				<cardinality min="1" max="1" />
			</validation>
		</field>
		<field searchable="true" name="carType" type="string" >
			<validation>
				<cardinality min="1" max="1" />
			</validation>
		</field>
		<field searchable="false" name="fuelPercentage" type="numeric">
			<validation>
				<cardinality min="1" max="1" />
				<range min="0" max="100" />
			</validation>
		</field>
		<field name="currentLocation" type="geospatial" />
		<field searchable="true" name="registrationCertificate" type="file" />
		<field name="lastServiceDate" type="date" />
	</fields>
</schema>
Note that document versioning is only available when using schemas. In order to enable it, set the versioning status at the beginning of the schema. The possible values are "disabled", "enabled", or "forced"; it defaults to "disabled".
create
Creates a schema.
| Parameter | Description |
|---|---|
| name | The name of the schema to be created. |
| content | The XML content of the schema. |
Return value: no result is returned. In case of a failure the appropriate error code and details will be returned in the metadata property (refer to common function response).
var schema = require("schema");
return schema.create("vehicleSchema", '<schema versioning="enabled"><aclGroups><aclGroup name="admin"><read>userA;group:admin</read><write>group:admin</write><fields><field>vehicleId</field><field>carType</field><field>registrationCertificate</field><field>lastServiceDate</field></fields></aclGroup><aclGroup name="devices"><read>authenticated</read><write>authenticated</write><fields><field>fuelPercentage</field><field>currentLocation</field></fields></aclGroup><defaultAcl><read>authenticated</read><write>authenticated</write><delete>group:admin</delete></defaultAcl><schemaAcl><read>nobody</read><write>nobody</write><delete>nobody</delete></schemaAcl></aclGroups><fields><field searchable="false" name="vehicleId" type="numeric" ><validation><cardinality min="1" max="1" /></validation></field><field searchable="true" name="carType" type="string" ><validation><cardinality min="1" max="1" /></validation></field><field searchable="false" name="fuelPercentage" type="numeric"><validation><cardinality min="1" max="1" /><range min="0" max="100" /></validation></field><field name="currentLocation" type="geospatial" /><field searchable="true" name="registrationCertificate" type="file" /><field name="lastServiceDate" type="date" /></fields></schema>');
update
Updates the content of a schema.
| Parameter | Description |
|---|---|
| name | The name of the schema to be updated. |
| content | The new XML content of the schema. |
Return value: no result is returned. In case of a failure the appropriate error code and details will be returned in the metadata property (refer to common function response).
delete
Deletes an existing schema.
| Parameter | Description |
|---|---|
| name | The name of the schema to be deleted. |
Return value: no result is returned. In case of a failure the appropriate error code and details will be returned in the metadata property (refer to common function response).
rename
Renames a schema. All existing documents with the old schema name will be updated to have the new schema name.
| Parameter | Description |
|---|---|
| name | The name of the schema to be renamed. |
| newName | The new name of the schema. |
Return value: no result is returned. In case of a failure the appropriate error code and details will be returned in the metadata property (refer to common function response).
list
Retrieves the list of all existing schemas.
Return value: JSON object containing an array of the schema names. In case of a failure the appropriate error code and details will be returned in the metadata property (refer to common function response).
{
	"metadata": {
			"status": "success"
		},
	"result": {
		"schemas": [
			{
				"name": "vehicleSchema"
			}
		]
	}
}
get
Retrieves a specific schema by name.
| Parameter | Description |
|---|---|
| name | The name of the schema to be retrieved. |
Return value: JSON object containing the content of the schema. In case of a failure the appropriate error code and details will be returned in the metadata property (refer to common function response).
var schema = require("schema");
return schema.get("vehicleSchema");
store Module
In scriptr.io, data and digital assets are persisted in a database container called a store. Individual data items persisted in a store are called documents.
All documents saved in a store are secured with store level ACLs, allowing developers to decide which devices, users and/or groups are permitted to save, query, delete documents or retrieve attachments from documents in that store.
The store module allows you to manage stores by offering the below functions. Note that free accounts can only have two stores.
When you create a scriptr.io account, a store called "DefaultStore" is automatically created for you. It is strongly advised to not delete the "DefaultStore" as you will lose all your triggers for the scheduled scripts and will no longer be able to schedule scripts.
create
Creates a new store along with its ACL. Throws the "DUPLICATE_STORE_NAME" exception if the store already exists.
| Parameter | Description |
|---|---|
| name | String representing the store name which is a unique identifier. |
| options | JSON object containing the store's ACL and a full text search flag. Optional. |
Return value: A JSON object containing the store name and its properties. In case of a failure the appropriate error code and details will be returned in the metadata property (refer to common function response).
The options object properties are as follows:
| Property | Description |
|---|---|
| acl | JSON object containing the access control list of the store determining who can save, delete, query or get attachments from its documents. Optional, defaults to nobody. |
| isSearchable | Boolean stating whether or not the created store will be searchable when using the full text search query option. A store can only be set to be searchable upon creation. Optional, defaults to false. |
The acl object properties are as follows:
| Property | Description |
|---|---|
| saveDocumentACL | Value representing the access control list that restricts saving documents in the store. It defaults to nobody. |
| deleteDocumentACL | Value representing the access control list that restricts document deletion from the store. It defaults to nobody. |
| getAttachmentACL | Value representing the access control list that restricts retrieval of file attachments from documents in the store. It defaults to nobody. |
| queryACL | Value representing the access control list that restricts access to queries on the store. It defaults to nobody. |
For each acl property above the value could be any of the following:
- A single value of type string if the ACL consists only of one device, user or group.
- An array of strings representing all the devices, users and groups in this ACL.
- A JSON object representing which values should be appended or deleted upon update (e.g. "saveDocumentACL": {"append":["admins", "editors"], "delete":["nobody"]}). This JSON object can have the following two properties:
- "append": the value of the "append" key should be a string or an array containing the values to be added to the existing ACL.
- "delete": the value of the "delete" key should be a string or an array containing the values to be deleted from the existing ACL.
var stores = require("store");

// Create the "myStore" store with the following ACLs
stores.create("myStore", {
	"acl" : {
		"saveDocumentACL" : "deviceA",
		"deleteDocumentACL" : ["deviceA", "group:firstFloor"],
		"queryACL" : "deviceB",
		"getAttachmentACL" : "deviceB"
	},
	"isStoreSearchable" : "true"
});
update
Updates a store; throws the "STORE_NOT_FOUND" exception if the store does not exist. The update function has the same signature as the create function; however, it does not accept the option's isStoreSearchable parameter.
var stores = require("store");

// Updates the deleteDocumentACL of the store "myStore". Note that the other ACLs will remain untouched if you don't pass them during an update.
return stores.update("myStore", {
	"deleteDocumentACL" : {
		"append" : "deviceB",
		"delete" : ["deviceA", "group:firstFloor"]
	}
});
delete
Deletes a store by name. Deleting a store is a background job and might require some time, the store would be disabled meanwhile. Once done, all the data and digital assets persisted in that store will be deleted.
| Parameter | Description |
|---|---|
| name | String representing the name of the store to be deleted. |
Return value: no specific result is returned. In case of a failure the appropriate error code and details will be returned in the metadata property (refer to common function response).
var stores = require("store");

// Delete the store with name "myStore"
return stores.delete("myStore");
get
Retrieves a specific store by name.
| Parameter | Description |
|---|---|
| name | String representing the name of the store to be retrieved. |
Return value: JSON object containing the store name and its properties. In case of a failure the appropriate error code and details will be returned in the metadata property (refer to common function response).
{
	"metadata" : {
		"status" : "success"
	},
	"result" : {
 		"isStoreSearchable": true,
		"saveDocumentACL" : [
			"deviceA"
		],
		"store" : "myStore",
		"deleteDocumentACL" : [
			"deviceA",
			"group:firstFloor"
		],
		"getAttachmentACL" : [
			"deviceB"
		],
		"queryACL" : [
			"deviceB"
		]
	}
}
list
Retrieves all available stores.
Return value: JSON object containing the array of the store names. In case of a failure the appropriate error code and details will be returned in the metadata property (refer to common function response).
{
	"result" : {
		"stores" : [{
				"name" : "DefaultStore"
			}, {
				"name" : "myStore"
			}
		]
	},
	"metadata" : {
		"status" : "success"
	}
}
twitter Module
Scriptr.io provides the twitter module that allows you to interact with Twitter. This module's APIs will use by default the configuration that you saved in your Settings. However, if you need to use the credentials of a different Twitter app, you can pass them as a parameter to any of the APIs as described below.
| Parameter | Description |
|---|---|
| credentials | Optional parameter of type object, holding the Twitter app's credentials to be used instead of the ones saved in the Settings. It can contain the following set of key/value pairs:
* not applicable for getRequestToken and getAccessToken. |
tweet
Updates the user's status (i.e., tweets on behalf of the user).
| Parameter | Description |
|---|---|
| tweetString | String representing the new status to post to Twitter. |
Return value: JSON object containing the result of the tweet. In case of a failure the appropriate error code and details will be returned in the metadata property (refer to common function response).
// Require the twitter module in order to be able to call the APIs
var tw = require("twitter");

// In this example, we are tweeting to Twitter using the configuration saved in Settings.
tw.tweet("Hello from scriptr.io!");

// In this example, we are tweeting to Twitter using a different set of configuration than the one saved in Settings.
var credentials= {
   "consumerKey": "yourConsumerKey",
   "consumerSecret": "yourConsumerSecret",
   "accessToken": "yourAccessToken",
   "accessTokenSecret": "yourAccessTokenSecret"
 };
return tw.tweet("Hello from scriptr.io!", credentials);
getHomeTimeLine
Retrieves the most recent tweets/retweets existing on the user's timeline. It uses the default options of Twitter's home_timeline API.
Return value: JSON object containing the home timeline of the user. In case of a failure the appropriate error code and details will be returned in the metadata property (refer to common function response).
getHomeTimeLineUrl
Retrieves a URL that when called, returns the most recent tweets/retweets existing on the user's timeline.
Return value: JSON object containing the URL to call in order to obtain the home time line of the user. In case of a failure the appropriate error code and details will be returned in the metadata property (refer to common function response).
callApi
Calls any API in the Twitter REST APIs and returns the result in a JSON string.
| Parameter | Description |
|---|---|
| resourceUrl | String representing the URL identifying the API to call. |
| verb | String representing one of the following method: GET, POST or PUT. |
| parameters | Object holding a set of key/value pairs containing API specific parameters. |
Return value: JSON object containing the response from the Twitter API call in JSON format. In case of a failure the appropriate error code and details will be returned in the metadata property (refer to common function response).
getApiCall
Calls any API in the Twitter REST APIs and returns a URL which, when called, retrieves the result in a JSON string.
| Parameter | Description |
|---|---|
| resourceUrl | String representing the URL identifying the API to call. |
| verb | String representing one of the following method: GET, POST or PUT. |
| parameters | Object holding a set of key/value pairs containing API specific parameters. |
Return value: JSON object containing the url/formEncodedParams that needs to be called to get the network's response for the requested API. In case of a failure the appropriate error code and details will be returned in the metadata property (refer to common function response).
getRequestToken
Requests a link to the login screen URL from Twitter.
| Parameter | Description |
|---|---|
| callbackUrl | String representing the URL that Twitter will redirect to after the application authorization step. |
Return value: JSON object containing the authorization URL and a pair of request token/secret. In case of a failure the appropriate error code and details will be returned in the metadata property (refer to common function response).
getAccessToken
Retrieves the user access token from Twitter that will be sent with all future requests for authentication purpose.
| Parameter | Description |
|---|---|
| requestToken | String representing the token identifying the user's request (returned by getRequestToken). |
| requestTokenSecret | String representing the token secret identifying the user's request (returned by getRequestToken). |
| oAuthVerifier | String representing the verifier parameter returned by Twitter in response to an authorization. This verifier will be sent as a parameter when calling the callbackUrl specified when calling getRequestToken. |
Return value: JSON object containing a pair of access token/access token secret. In case of a failure the appropriate error code and details will be returned in the metadata property (refer to common function response).
user Module
The user module allows you to create and manage users. Each user is associated to the below schema that provides the basic user fields and ACLs. You can modify the schema to meet your needs by updating the apsdb_user system schema.
<!--
This is the default user schema. Feel free to modify it to your liking.
This schema follows all rules and restrictions as all other schemas, as do the documents (users) created out of it.
However, it imposes the following restrictions of its own:
1. The six default fields (groups, name, login, password, locale and isSuspended) are required.
2. This schema cannot be deleted.
Additionally, since this schema is used for user management, the following ACLs are set by default upon creation of each new user document:
- document.readACL = login, creator
- document.writeACL = login, creator
- required.readACL = nobody
- required.writeACL = nobody
- requiredVisibles.readACL = creator
- requiredVisibles.writeACL = nobody
- requiredEditables.readACL = creator
- requiredEditables.writeACL = creator
You can specify your own ACLs upon user creation by passing them as parameters to the save() function of the user module as described in the documentation.
-->
<schema>
  <aclGroups>
    <aclGroup name="required">
      <read>nobody</read>
      <write>nobody</write>
      <fields>
        <field>isSuspended</field>
      </fields>
    </aclGroup>
    <aclGroup name="requiredVisibles">
      <read>creator</read>
      <write>nobody</write>
      <fields>
        <field>login</field>
        <field>groups</field>
      </fields>
    </aclGroup>
    <aclGroup name="requiredEditables">
      <read>creator</read>
      <write>creator</write>
      <fields>
        <field>name</field>
        <field>password</field>
        <field>locale</field>
      </fields>
    </aclGroup>
    <defaultAcl>
      <read>creator</read>
      <write>creator</write>
    </defaultAcl>
    <schemaAcl>
      <read>creator</read>
      <write>creator</write>
      <delete>nobody</delete>
    </schemaAcl>
  </aclGroups>
  <fields>
    <field name="login" type="string"/>
    <field name="name" type="string"/>
    <field name="groups" type="string"/>
    <field name="password" type="string" />
    <field name="locale" type="string" />
    <field name="isSuspended" type="string" />
  </fields>
</schema>
save
Saves a user with the provided parameters. If the user already exists, it gets updated; otherwise, it gets created.
| Parameter | Description |
|---|---|
| user | A JSON object containing the user fields. |
Return value: no result is returned. In case of a failure the appropriate error code and details will be returned in the metadata property (refer to common function response).
The user object properties are as follows:
| Property | Description |
|---|---|
| id | String representing the unique identifier of the user. It accepts alphanumeric characters, at signs (@), underscores (_), periods (.), and dashes (-) and can have a maximum length of 243 characters. |
| name | String representing the name of the user. Optional upon update. |
| password | String representing the password of the user. Optional upon update. |
| groups | Represents the group(s) to which this user will be added. It can have any of the following values:
Group name accepts alphanumeric characters (a-z A-Z 0-9), dashes (-) and underscores (_), and can have a maximum length of 128 characters. Note that passing a null or empty value removes the user from all groups. |
| isSuspended | Boolean value specifying whether or not the user is suspended. Optional, defaults to false. When set to true, the user will be treated as if it was deleted from the system. It can be reactivated by updating this value to false. |
| globalDateFormat | String representing the date format to use to parse any date field values passed as string. Optional, if not specified, the formats "yyyy-MM-dd'T'HH:mm:ssZ" (e.g. 2017-01-13T13:01:02+0000) and "yyyy-MM-dd" (e.g. 2017-01-13) only will be accepted. Refer to this document for the accepted date formats. |
| meta.types | JSON object containing the list of the document field names to be created/updated along with their corresponding types. The field types can be:
Note that any fields omitted from the meta.types will default to type string, unless otherwise specified in the corresponding user schema. |
| <fieldName> | Key-value pair representing the name of the field along with its values. Each value can be:
Note that passing a null or empty value deletes the field from the user. A field of type file should always be defined in the schema first. |
var users = require("user");

var params = {
	"id" : "john.doe@example.com",
	"password" : "1a2afef9b19c975b429a92ec22e873c8",
	"name" : "John Doe",
	"description" : "Security services employee",
	"lastOnline" : new Date(),
	"groups" : ["groupA", "groupB"],
	"meta.types" : {
		"description" : "text",
		"lastOnline" : "date"
	}
};

return users.save(params);
create
Creates a new user; throws the "DUPLICATE_USER" exception if a user with the same ID already exists, or a "DUPLICATE_DEVICE" exception if a device with the same ID already exists. The create function takes the same parameter as the save function.
update
Updates a user; throws the "INVALID_USER" exception if the user does not exist. The update function takes the same parameter as the save function.
delete
Deletes a user based on the specified ID.
| Parameter | Description |
|---|---|
| id | String representing the ID of the user to be deleted. |
Return value: no result is returned. In case of a failure the appropriate error code and details will be returned in the metadata property (refer to common function response).
get
Retrieves a user by ID.
| Parameter | Description |
|---|---|
| id | String representing the identifier of the user to be retrieved. |
| includeFieldType | Boolean which, when set to true, will return the meta.types property that contains the list of the user document's fields along with their corresponding field types. |
Return value: JSON object containing all the fields of the requested user. In case of a failure the appropriate error code and details will be returned in the metadata property (refer to common function response).
query
Queries user data according to the conditions passed in the provided filter.
| Parameter | Description |
|---|---|
| filter | JSON object containing the parameters to be sent along with the query request. |
Return value: JSON object containing array of users matching the query filter. In case of a failure the appropriate error code and details will be returned in the metadata property (refer to common function response).
The filter object properties are as follows:
| Property | Description |
|---|---|
| query | String representing the query condition to execute. Optional. |
| ftsQuery | String used to refine the search after executing the query condition by performing a full-text search on the returned users. Only the fields that are set to "searchable" in the user schema can be searched against using the ftsQuery. Note that when using the ftsQuery parameter, the sort parameter will be ignored. |
| count | Boolean specifying whether or not to return the total count of users found. Optional, defaults to false. Note that if the ftsQuery parameter is sent in the request, the count will be equal to the number of users returned in the first page instead of the total number of hits. |
| fields | String containing a comma separated list of fields that should be returned by the query. Optional if the count property is passed in the filter. In order to return all fields, you can pass the * wildcard. The query will always return the user ID in addition to the specified fields. Note that in addition to the user defined fields, you can retrieve the system fields: creator, lastModifiedDate, lastModifiedBy, creationDate, versionNumber and latest. |
| sort | String containing a comma separated list of the fields on which to sort. Optional. The syntax for sorting fields is: "fieldName<fieldType:sortingOrder>". For instance, to sort a document by name and birthday fields, you could pass in the value “name<string:ASC>, birthday<date:DESC>”. Note that this parameter is ignored when using the ftsQuery parameter. |
| resultsPerPage | Numeric value that determines the number of documents per page to return. Optional, defaults to 50. |
| pageNumber | Numeric value representing the number of the page to be returned. Optional, defaults to 1. |
| includeFieldType | Boolean specifying whether or not to return the meta.types property for each user. The meta.types is a JSON object containing the names and types of the fields returned by the query. Optional, defaults to false. |
var users = require("user");

// Look for users in "groupA"
return users.query({"query":'groups in ["groupA"]', "fields":"*", "sort":"name<string:ASC>, lastOnline<date:DESC>"});
// OR
return users.query({"query":'groups = "groupA"', "fields":"*", "sort":"name<string:ASC>, lastOnline<date:DESC>"});
{
	"result" : {
		"users" : [{
				"description" : "Security services employee",
				"groups" : [
					"groupA",
					"groupB"
				],
				"login" : "john.doe@example.com",
				"name" : "John Doe",
				"id" : "john.doe@example.com",
				"creator" : "scriptr@L22826DC91",
				"versionNumber" : "1.0",
				"latest" : "1.0",
				"lastModifiedBy" : "scriptr",
				"creationDate" : "2017-01-10T15:00:20+0000",
				"lastModifiedDate" : "2017-01-10T15:12:59+0000"
			}
		]
	},
	"metadata" : {
		"status" : "success"
	}
}
getAttachment
Retrieves an attachment from a specific user.
| Parameter | Description |
|---|---|
| id | String representing the identifier of the user. |
| fileName | String representing the name of the requested file attachment. |
| fieldName | String representing the name of the field under which the requested file is saved. |
Return value: JSON object containing the properties and content of the file attachment. In case of a failure the appropriate error code and details will be returned in a metadata property.
generateToken
Generates a token for the specified user. You can generate 20 tokens per user.
The generated token expires based on the values that you set.
| Parameter | Description |
|---|---|
| id | String representing the identifier of the user for which the token should be generated. |
| options | JSON object containing additional options. If not passed, the default values will apply. |
Return value: JSON object containing the generated token and its properties. In case of a failure the appropriate error code and details will be returned in the metadata property (refer to common function response).
The options object properties are as follows:
| Property | Description |
|---|---|
| password | String representing the user's password to trigger an additional verification step for performing this operation. If not provided, this security check will be omitted. |
| expiry | Integer or string representing the relative time, in seconds, after which the token expires and becomes unusable. The default expiry is 1800 seconds (30 minutes). It should always be less or equal to 86400 seconds (24 hours). |
| lifeTime | Integer or string representing the relative time, in seconds, after which the token cannot be renewed. The default lifeTime is 7200 seconds (2 hours). It should always be less or equal to 604800 seconds (1 week). |
| bindToReferrer | Boolean or string that determines whether or not the tokens will be bound to the issuing request's referrer. It defaults to true. When a token is bound to a referrer, requests signed by this token can only work with this provided referrer. |
var users = require("user");

// Generate a token for user "myUser"
return users.generateToken("myUser", {"password": "password", "expiry": 1800, "lifeTime": 7200, "bindToReferrer": "false"});
{
    "result": {
        "token": "TjA2QjI2MTc0MTpnZ25EMMMyOjhDNjdENTFFRUVDOTEwBjkxMUE0NEZENDlPRkQ4Q0Iw"
    },
    "metadata": {
        "status": "success"
    }
}
renewToken
Renews a token for the specified user.
| Parameter | Description |
|---|---|
| id | String representing the identifier of the user for which the token should be renewed. |
| token | String representing the token that needs to be renewed. |
Return value: JSON object containing the newly generated token and its properties. In case of a failure the appropriate error code and details will be returned in the metadata property (refer to common function response).
var users = require("user");

// Renew the provided token for user "myUser"
return users.renewToken("myUser", "TjA2QjI2MTc0MTpnZ25EMMMyOjhDNjdENTFFRUVDOTEwBjkxMUE0NEZENDlPRkQ4Q0Iw");
revokeToken
Deletes the token of the specified user.
| Parameter | Description |
|---|---|
| id | String representing the identifier of the user for which the token should be revoked. |
| token | String representing the token that needs to be revoked. |
Return value: no value is returned. In case of a failure the appropriate error code and details will be returned in the metadata property (refer to common function response).
revokeTokens
Revokes all the tokens of the specified users.
| Parameter | Description |
|---|---|
| idList | Either a string or an array of strings containing the identifiers of the users for which the tokens will be revoked. |
Return value: no value is returned. In case of a failure the appropriate error code and details will be returned in the metadata property (refer to common function response).
var users = require("user");

users.revokeTokens(["id1","id2"]);
return users.revokeTokens("id3");
Real-time Communication
Scriptr.io supports WebSocket connections to enable asynchronous 2-way communication allowing devices, scripts, and other "things" to communicate in a real-time fashion.
To create a WebSocket connection to scriptr.io, establish a connection to the following endpoint using any of your scriptr.io tokens including your anonymous token:
wss://api.scriptrapps.io/<YOUR TOKEN>
Executing a Script over WebSocket
You can call scriptr.io scripts through WebSocket by sending a JSON message with the following keys:
Key | Description |
|---|---|
| method | The script name to be executed. |
| params | A map containing the parameters expected by the script being called. |
The call will return a JSON object with the following keys:
| Key | Description |
|---|---|
| id | Identifier that maps WebSocket client messages to server messages. |
| status | Either "success" or "failure" indicating the status of the operation. |
| statusCode | Code indicating the status of the operation. |
| result | The output return by the executed script. |
wscat -c wss://api.scriptrapps.io/<YOUR TOKEN>
connected (press CTRL+C to quit)
< {"id":"7fea5a34","status":"success","result":"connected."}
> {"method":"MySriptName","params":{"param1":"value1","param2":["value2","value3"]}}
< { "id": "7fea5a34-be7f-ab40-08f9-713fb3a79b4e", "status": "success", "statusCode": "200", "result": "The output of your script."}
Publish-Subscribe over WebSocket
Scriptr.io offers the Publish, Subscribe and Unsubscribe APIs over WebSocket. They all return a JSON object with the following keys:
| Key | Description |
|---|---|
| id | Identifier that maps WebSocket client messages to server messages. |
| status | Either "success" or "failure" indicating the status of the operation. |
| statusCode | Code indicating the status of the operation. |
Publish
To publish a message to a specified channel that will be distributed to its subscribers, send a JSON message with the method set to "Publish" along with the following parameters:
Parameter | Description |
|---|---|
| channel | The channel name. |
| message | The message to be distributed to subscribers. |
wscat -c wss://api.scriptrapps.io/<YOUR TOKEN>
connected (press CTRL+C to quit)
< {"id":"7fea5a83","status":"success","result":"connected."}
> {"method":"Publish","params":{"channel":"myChannel","message":"Hello World!"}}
< { "id": "7fea5a83-be7f-ab40-08f9-713fb3a79b4e", "status": "success", "statusCode": "200"}
Subscribe
To subscribe the WebSocket connection to a channel in order for it to read all the messages published to that channel, send a JSON message with the method set to "Subscribe" along with the following parameter:
Parameter | Description |
|---|---|
| channel | The channel name. |
wscat -c wss://api.scriptrapps.io/<YOUR TOKEN>
connected (press CTRL+C to quit)
< {"id":"7fea5a82","status":"success","result":"connected."}
> {"method":"Subscribe","params":{"channel":"myChannel"}}
< { "id": "7fea5a82-be7f-ab40-08f9-713fb3a79b4e", "status": "success", "statusCode": "200"}
Unsubscribe
To unsubscribe the WebSocket connection from a channel in order to stop receiving future messages, send a JSON message with the method set to "Unsubscribe" along with the following parameter:
Parameter | Description |
|---|---|
| channel | The channel name. |
wscat -c wss://api.scriptrapps.io/<YOUR TOKEN>
connected (press CTRL+C to quit)
< {"id":"7fea5a84","status":"success","result":"connected."}
> {"method":"Unsubscribe","params":{"channel":"channelName"}}
< { "id": "7fea5a84-be7f-ab40-08f9-713fb3a79b4e", "status": "success", "statusCode": "200"}
You can control who is allowed to subscribe and/or publish to your channels by setting their ACLs. For more information, refer to Channels.
Message Queuing and Broadcasting
The Message Queuing and Broadcasting feature is an add-on that enables the queuing system and allows communication over the MQTT and AMQP protocols.
Scriptr.io MQTT Broker
MQTT is a light-weight messaging protocol that is widely used in the Internet of Things to broacast messages to multiple recipients. Messages are usually published to a topic and are consumed by recipients that are subscribed to the latter. The middleware service that manages topics, messages and subscriptions is called an MQTT broker. Scriptr.io supports the MQTT protocol, effortlessly turning your scriptr.io account into an MQTT broker.
To allow client applications and/or devices to send/receive messages to/from your scriptr.io account via MQTT, you need to (1) create devices in your scriptr.io account then, (2) retrieve the MQTT configuration and finally, (3) establish an MQTT connection.
1) Creating devices
If you already have created devices in your account, you can skip this step. The devices' credentials will be used by client applications or physical devices to authenticate when publishing messages towards your scripts. You can create devices using the device directory or programmatically using the device module.
2) Retrieving your MQTT configuration
Next step is to get the MQTT configuration of your account. Click on the arrow near your username in the top-right corner of the IDE and select the "Messaging Protocols" option. In the resulting configuration form, do the following:
- Select MQTT from the Protocol drop-down.
- Select a device from the Device drop-down in the Credentials section. A username and a password are automatically generated for that device. Your client application or physical device will use these when sending messages to your scriptr.io account.
- Select a channel used by publishers to send messages and by subscribers to consume them. Selecting a channel displays two topics:
- The message topic to be used when broadcasting a message (
<ANONYMOUS TOKEN>/<CHANNEL NAME>/message). - The invoke topic to be used when invoking a script (
<ANONYMOUS TOKEN>/<CHANNEL NAME>/invoke).
- The message topic to be used when broadcasting a message (
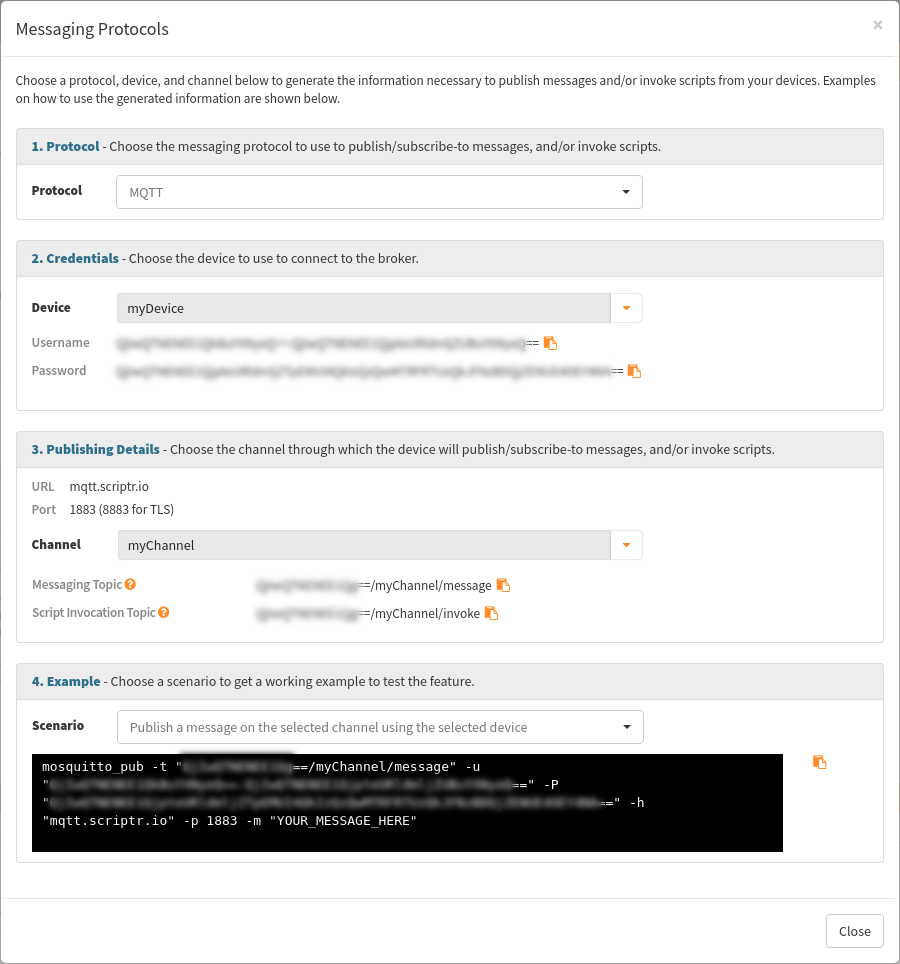
3) Establishing an MQTT connection
When establishing the MQTT connection, your client application and/or physical devices should specify the username and password of one of your devices, as obtained from the "Messaging Protocols" dialog:
// this is an example written in Node.js. Note that the below is given for illustration purposes as the logic might vary depending on the library you're using.
var client = mqtt.connect("mqtts://mqtt.scriptr.io:8883", {
	clientId : "some_client_id",
	username : "username_retrieved_from_the_messaging_protocols_dialog",
	password : "password_retrieved_from_the_messaging_protocols_dialog"
});
Invoking a Script over MQTT
When publishing messages to your scriptr.io account via MQTT, your client applications/physical devices can target a specific script that will get executed upon reception of the message, by sending a JSON message with the following keys:
Key | Description |
|---|---|
| method | The script name to be executed. |
| params | A map containing the parameters expected by the script being called. |
When publishing the message, client applications and/or physical devices need to specify the invoke topic:
// this is an example written in Node.js. Note that the below is given for illustration purposes as the logic might vary depending on the library you're using.
var msg = {
	method : "full_script_name", // i.e  myroot/myscript
	params : {
		data : some_data
	}
};

client.publish("<ANONYMOUS TOKEN>/<CHANNEL NAME>/invoke", JSON.stringify(msg)); // e.g. client.publish("UzIyGHDem2Nl==/pubsub/invoke", JSON.stringify(msg));
Upon reception of the message, the specified scriptr.io script will get executed and can access the parameters sent in the message from the request object (e. g. request.parameters).
Publish-Subscribe over MQTT
Publishing messages to scriptr.io
When publishing messages to your scriptr.io account via MQTT, your client applications/physical devices can use the message topic to broadcast messages to subscribers.
// this is an example written in Node.js. Note that the below is given for illustration purposes as the logic might vary depending on the library you're using.
client.publish("<ANONYMOUS TOKEN>/<CHANNEL NAME>/message", "message to publish"); // e.g. client.publish("UzIyGHDem2Nl==/pubsub/message", "message to publish");
Consuming messages from scriptr.io
There are two types of message consumers: (a) client applications/ physical devices and (b) scriptr.io scripts. To receive the messages that are published to a given message topic, client applications/ physical devices need to subscribe to that same topic. As for scripts, they only need to subscribe to the associated channel.
a) Subscribing client applications/ physical devices to a topic
Client applications/ physical devices first need to establish a connection.
To consume messages, client applications/ physical devices have to subscribe to the message topic:
// this is an example written in Node.js. Note that the below is given for illustration purposes as the logic might vary depending on the library you're using.
client.subscribe("<ANONYMOUS TOKEN>/<CHANNEL NAME>/message");
b) Subscribing scriptr.io scripts to a channel
You need to subscribe the scripts to the channel associated with the message topic, as described in section Subscribing Scripts to Channels.
Scriptr.io AMQP Broker
AMQP is a robust messaging protocol largely used in enterprise systems and IoT applications. In the AMQP terminology, messages are sent to exchanges by producers, then routed to queues from which they are retrieved by consumers. Exchanges and queues are usually hosted by a virtual host. The middleware service that manages exchanges, queues, messages and virtual hosts is called an AMQP broker. Scriptr.io supports the AMQP protocol, turning effortlessly your scriptr.io account into an AMQP broker.
To allow client applications and/or devices to send/receive messages to/from your scriptr.io account via AMQP, you need to (1) create devices in your scriptr.io account then, (2) retrieve the AMQP configuration and finally, (3) establish an AMQP connection.
1) Creating devices
If you already have created devices in your account, you can skip this step. The devices' credentials will be used by client applications or physical devices to authenticate when publishing messages towards your scripts. You can create devices using the device directory or programmatically using the device module.
2) Retrieving your AMQP configuration
Next step is to get the AMQP configuration of your account. Click on the arrow near your username in the top-right corner of the IDE and select the "Messaging Protocols" option. In the resulting condfiguration form, do the following:
- Select AMQP from the Protocol drop-down.
- Select a device from the Device drop-down under the Credentials section. A username and a password are automatically generated for that device. Your client application or physical device will use these when connecting to your scriptr.io account and sending messages to it.
- Select a channel used by producers to send messages and by consumers to consume them. Selecting a channel displays the exchange (
<ANONYMOUS TOKEN>-<CHANNEL NAME>) and two routing keys:- The message routing key to be used when broadcasting a message (
<ANONYMOUS TOKEN>.<CHANNEL NAME>.message). - The invoke routing key to be used when invoking a script (
<ANONYMOUS TOKEN>.<CHANNEL NAME>.invoke).
- The message routing key to be used when broadcasting a message (
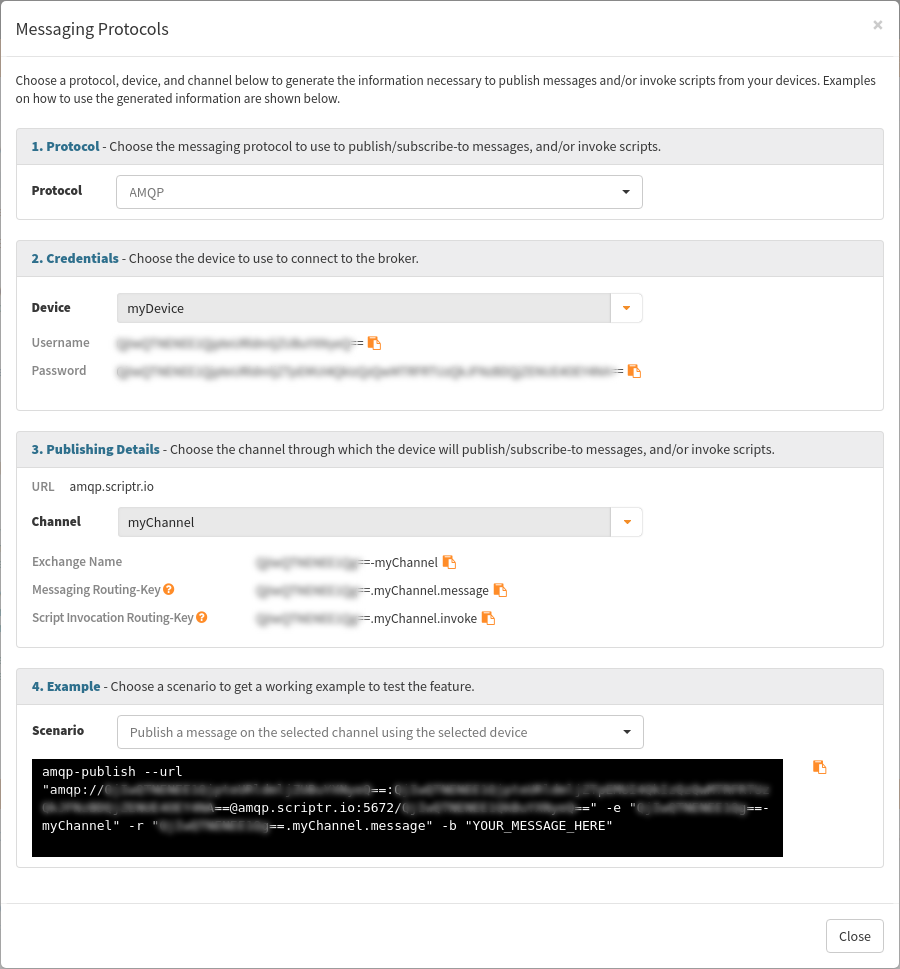
3) Establishing an AMQP connection
When establishing the AMQP connection, your client application and/or physical devices should specify the username and password of one of your devices and the virtual host, as obtained from the "Messaging Protocols" dialog:
// this is an example written in Node.js. Note that the below is given for illustration purposes as the logic might vary depending on the library you're using.
var connection = amqp.createConnection({
		host: "amqp.scriptr.io",
		vhost: "virtual_host_retrieved_from_the_messaging_protocols_dialog",
		login: "username_retrieved_from_the_messaging_protocols_dialog",
		password: "password_retrieved_from_the_messaging_protocols_dialog"
	}
);
Invoking a Script over AMQP
When publishing messages to your scriptr.io account via AMQP, your client applications/ physical devices can target a specific script that will get executed upon reception of the message by sending a JSON message with the following keys:
Key | Description |
|---|---|
| method | The script name to be executed. |
| params | A map containing the parameters expected by the script being called. |
When publishing the message, client applications and/or physical devices need to specify the invoke routing key:
// this is an example written in Node.js. Note that the below is given for illustration purposes as the logic might vary depending on the library you're using.
var msg = {
	method : "full_script_name", // i.e  myroot/myscript
	params : {
		data : some_data
	}
};

connection.publish("<ANONYMOUS TOKEN>.<CHANNEL NAME>.invoke", msg); // e.g. connection.publish(UzIyGHDem2Nl==.pubsub.invoke", msg)
Upon reception of the message, the specified scriptr.io script will get executed and can access the parameters sent in the message from the request object (e. g. request.parameters).
Publish-Subscribe over AMQP
Publishing messages to scriptr.io
When publishing messages to your scriptr.io account via AMQP, your client applications/physical devices can use the message routing key to broadcast messages to subscribers.
// this is an example written in Node.js. Note that the below is given for illustration purposes as the logic might vary depending on the library you're using.
connection.publish("<ANONYMOUS TOKEN>.<CHANNEL NAME>.message", msg}); // e.g. connection.publish(UzIyGHDem2Nl==.pubsub.message", msg)
Consuming messages from scriptr.io
There are two types of message consumers: (a) client applications/ physical devices and (b) scriptr.io scripts. To receive the messages that are published using a given message routing key, client applications/ physical devices need to consume using that same routing key. As for scripts, they only need to subscribe to the associated channel.
a) Subscribing client applications/ physical devices to a topic
Client applications/ physical devices first need to establish a connection.
To consume messages, client applications/ physical devices have to subscribe using the message routing key:
// this is an example written in Node.js. Note that the below is given for illustration purposes as the logic might vary depending on the library you're using.
connection.consume("<ANONYMOUS TOKEN>.<CHANNEL NAME>.message", callback_function);
b) Subscribing scriptr.io scripts to a channel
You need to subscribe the scripts to the channel associated with the message routing key, as described in section Subscribing Scripts to Channels.
Creating RESTful APIs
Every script in scriptr.io can be used as an API that is reachable through an endpoint of the form https://api.scriptrapps.io/[scriptName]/. When calling a script, to be REST-compliant, scriptr.io allows you to pass parameters in the URI in the form https://api.scriptrapps.io/[scriptName]/[parameter], and read them from the pathInfo property of the request object (refer to the request object documentation). For instance, if you want to create a REST API for managing vehicles, you would want to create a script called vehicle and allow users to retrieve a certain vehicle by ID by issuing a GET request to the following endpoint:
https://api.scriptrapps.io/vehicle/<vehicleId>
To access the vehicleId parameter from within your script, use the pathInfo parameter of the request built-in object. Below is an example of a script that manages vehicles:
var documents = require("document");
var vehicle;

switch(request.method) {
    case "GET":
        vehicle = documents.get(request.pathInfo);
        break;
    case "PUT":
        vehicle = documents.save(JSON.parse(request.rawBody));
        break;
    case "POST":
        vehicle = documents.create(JSON.parse(request.rawBody));
        break;
    case "DELETE":
        vehicle = documents.delete(request.pathInfo);
        break;
    default:
        response.setStatus(501);	// Not Implemented
        var responseMetadata = {
            "response": {
                "metadata": {
                    "requestId": request.id,
                    "status": "failure",
                    "statusCode": "501"
                },
                "result": "HTTP method not implemented."
            }
        }
        response.write(JSON.stringify(responseMetadata));
        response.addHeaders(configuration.crossDomainHeaders);
		response.close();
		return;
}

return vehicle;
Handling Files
Sending a File to Your Scripts
Scriptr.io handles multi-part requests with binary data and thus, you can easily upload files to your scripts.
The below is the curl instruction to send to your script in order to upload a file. Notice that you need to give a name to your file field (myFile in the example).
curl -X POST -F myFile=@account.png -H 'Authorization: bearer RzM1RkYwQzc4MjpzY3JpcHRyOjQxODBFRDREQTAxQzc2REU4QjcxNTdEMjE4NUZENEUy' 'https://api.scriptrapps.io/multipart'
Retrieving a File from the Request in a Script
All files sent to a script can be retrieved from the files property of the built-in request object. Check the below code to see how easy it is to manipulate files in scriptr.io.
// Retrieve content of the "files" field from the built-in "request" object.
// The "request" object wraps the HTTP request that triggered our script and has a property called "files".
// The "files" property of the "request" object is a map where each file sent to the request is mapped to a field with the same name
var filesInRequest = request.files;
if (request.files) {
   // When we uploaded the file, we associated it to a field called "myFile"
   // this field should end up as a field of the "files" property of the "request" object
   // in the below, we check if "files" contains the "myFile" field and if the latter is not empty
   if (filesInRequest.myFile && filesInRequest.myFile.length > 0) {
     // Do something with the file
   }
}
return "no file";
Send the File to a Remote API using the http Module
In the following, we alter the preceding example by adding a call to a remote API and pass the file that was received in the request.
// Require the http module
var http = require("http");
// Retrieve content of the "files" field from the built-in "request" object
var filesInRequest = request.files;
if (filesInRequest) {
  // When we uploaded the file, we associated it to a field called "myFile"
  // this field should end up as a field of the "files" object
  // in the below, we check if "files" contains the "myFile" field and if the latter is not empty
  if (filesInRequest.myFile && filesInRequest.myFile.length > 0) {

    var requestObject = {
  		"url": "https://www.googleapis.com/drive/v1/files",
 		"params": {
  			"kind": "drive#file",
  			"id": "myFile",
  			"title": "someTitle"
        },
      	"files": {"myFile": filesInRequest.myFile},
  		"method": "POST"
	}
	// send the request by invoking the request function of the http module and store the returned response object
	var response = http.request(requestObject);
    return "got a file";
  }
}
return "no file";
Rate Limiting
To ensure a smooth experience and fair usage of scriptr.io's services, all incoming requests and system APIs are subject to rate limiting. There are mainly two types of rate limits, the requests rate limits and the scripting APIs rate limits as described in the following sections.
Note that rate limiting is on a per-account basis. It includes an average rate and caters for peaks.
The rate limits specified below apply to the free-mium pricing model. If you wish to increase the rate limits for your account please contact our sales team.
Requests Rate Limits
Incoming requests are any calls made to your scriptr.io account.
Peak Rates
Rates are calculated over a 1 second window and are configured with a 10 requests/second limit. This limit applies to both authenticated and anonymous requests.
Average Rates
Average rate limits are calculated over a 5 minute window allowing 600 requests.
HTTP Headers and Response Codes
When an application exceeds the rate limit for a given endpoint, the request will return an HTTP 429 “Too Many Requests” response code.
Scripting APIs Rate Limits
Scripting APIs, in this context, refers to the scriptr.io built-in APIs that you invoke within your scripts (e.g. sendMail, save device, etc.).
Peak Rates
Rates are calculated over a 1 second window and are configured with a 20 requests/second limit.
Average Rates
Average rate limits are calculated over a 5 minute window allowing 3,000 API calls.
HTTP Headers and Response Codes
When an application exceeds the rate limit for a given scripting API, the API will return a 429 “Too Many Requests” response code.